Tag: ladybug birthday cake

  • Ladybug Smash Cake

    Ladybug Smash Cake

    ladybug smash cake

    When my ‘little love bug’ turned 1 …

    Honestly, I had to spend some time wondering where all the time had gone when my ‘little love bug’ was about to turn one. (Just like everyone warned me, the year went SO fast!) But after some time scrolling back through her little newborn pictures (okay, and after a few happy/sad tears), I turned my attention to planning a first birthday party!

    Smash cakes are a first birthday near-necessity (imho), so in the month beforehand I spent hours searching for Ladybug smash cake ideas 🙂

    I very much on purpose didn’t go for anything too complicated. We were wrapping up a cross-country move at the time, and tons of my spare time (read: nap time) was going into unpacking and sorting out our house. I was still trying to organize a kitchen, and most of my cake stuff was either in boxes or horrendously disorganized in a corner cabinet. So I nixed the idea of a sculpted / ladybug-shaped cake. This was the design I decided on, and I really loved the way it turned out!  

    Recipe’s in the card below – but before you get there – please don’t be intimidated by my long-winded instructions! I write instructions a bit on the detailed / lengthy side as an attempt at clarity. This cake truly was a fast and easy assembly! I recommend giving the video a quick watch; it’s less than a minute long. (Honestly, most of the instructions could be summed up in the video!) 

    My little one loved her Ladybug Smash cake, and I loved watching her with it! 

    Editing to add one more quick FYI!

    I didn’t think of this at the time I posted the recipe – I was still a fairly new mom at the time. But now with my second little one that likes to stuff EVERY imaginable thing in his mouth – I’m adding this note.

    I’d recommend pulling the ladybugs off the cake if you think baby might stuff them in their mouth. While they’re edible, they really don’t chew well or dissolve easily and might turn into a choking hazard. 

    See below for the recipe – and happy baking! 

    FAQs: 

    “Can I just use frosting to make the ladybugs?” 

    • If you have a really delicate touch with frosting – and time to spend chilling it – go for it. I’d imagine you’ll need to pipe and chill the frosting to shape and decorate it, and maybe freeze them in order to transfer them. They’ll be a little more finicky, but hey – they’ll taste better! 

    “Your recipe calls for cake mixes? Seriously?” 

    • Okay, all my scratch recipe purists – hear me out on this one! 😉 I’m ALL about those scratch recipes because nothing beats them for taste. One catch though – all of my  favorite scratch recipes are delicious, but they bake a little bit too dense to be easily smash-able by little hands. After making many smash cakes over several years, I’ve found cake mixes to work the best. Kiddos need to be able to smash their smash cakes! 😉
    • If you’d like a scratch recipe though, a half batch of my favorite Vanilla Cake layer recipe is a perfect size for smash cakes! 🙂 

    (Disclosure: As an Amazon associate, I may earn from qualifying purchases and my posts often contain affiliate links. If you click a link and make a purchase, I may receive a commission at no extra cost to you!)

    Don’t forget to pin this recipe for later!

    Ladybug Smash Cake pinterest pin

    Ladybug Smash Cake

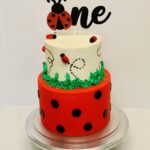
    Cute first birthday Ladybug smash cake – fondant ladybugs and a cute topper make this one a cinch to bake and decorate!
    Prep Time20 minutes
    Cook Time30 minutes
    Decorating time30 minutes
    Total Time1 hour 20 minutes
    Course: Dessert
    Cuisine: American
    Keyword: ladybug smash cake
    Servings: 8 people
    Calories: 688kcal
    Author: Sarah H

    Equipment

    Ingredients

    Cake

    Frosting

    Decorations

    Instructions

    Cake

    • Preheat oven to 350°F. Prepare two 6-inch round pans with baker's floured cooking spray (or grease and line with parchment rounds).
    • Combine melted butter, buttermilk, eggs, and vanilla in a large bowl and mix until combined. Add in cake mix and stir until moistened (about 30 seconds), then beat on medium speed for about 2 minutes.
    • Using a kitchen scale, divide batter evenly between the two 6” pans – I had about 450 grams in each of my smaller pans. You may have a bit less batter if using cake mixes. (Using the kitchen scale guarantees your layers will bake to be the same height.)
    • Bake for 35-37 minutes, (or until a skewer comes out clean). Allow to cool for 10 minutes, then run an offset spatula around perimeter of the pans to separate the cake from the pans. Place cake layers into the freezer for 45 minutes, to accelerate the cooling process. While you’re waiting…make your frosting!

    Frosting

    • Beat together softened cream cheese and butter; slowly add in powdered sugar alternating with milk until frosting reaches desired consistency.
    • Add vanilla and salt if needed and beat until well combined. (I waited until my cake was stacked and frosted, then colored the remaining frosting for the green ‘grass’ border.)

    Assembly

    • Once your cakes are cool, level them – this can be done with a cake leveler or a large serrated knife and a ruler. Place a smear of frosting on your cake circle (to keep the cake from sliding while you decorate it) and center your first cake layer in the center of the circle. Spread the layer with frosting. Add your second cake layer on top – I like to flip the top layer upside down to make smoothing the edges easier.
    • Now you're ready to crumb-coat . If you're unfamiliar with crumb-coating, it's just what it sounds like – spreading a thin layer of frosting over the entire outside of the cake tiers to keep crumbs out of your final layer. Once your crumb coat has set (this takes about 10 minutes in the fridge), add your final layer of frosting and smooth (I like to use an offset spatula and bench scraper for my final frosting layers).

    Decorating

    • To make the ladybugs, roll about ½ a tablespoon of fondant into an oblong circle and flatten slightly on one end. With a dab of water stick about a ½ teaspoon size ball of black fondant to the flattened end. I used a toothpick and the blunt end of a skewer to make the lines and dots on the ladybug’s back, but a paintbrush would work as well. Allow 1-2 hours to dry before transferring to the cake.
    • I flattened the angled end of a picture hanger hook and used it as a stamp to make the little dotted lines on the side of the cake, but an angled paintbrush would work as well. I found it the easiest to put on the lines first and then the ladybugs at the ends. With a leaf tip and the multi-hole grass tip (both the tips I used are in this set or you can use the Wilton grass tip and the middle tip from this set) pipe a rim of short and tall grass around the base.
    • Optional, but I loved this Ladybug Cake Topper in a décor set I found on Amazon!  I thought it looked super cute and finished the cake off really well.

    Video

    Notes

    Make this recipe? Let me know how it went – or make my day and find me on Pinterest or on Instagram and tag @IntensiveCakeUnit in your photo!

    Nutrition

    Serving: 1slice | Calories: 688kcal | Carbohydrates: 95g | Protein: 6g | Fat: 33g

    Did you make this Ladybug Smash Cake? 

    Let me know how it went – or make my day and find me on Pinterest or on Instagram and tag @IntensiveCakeUnit in your photo!

    You can also add a comment or a recipe rating at the bottom of the page! 🙂

    Questions / comments? Send me an email! 

    Other birthday cakes you may love…

    (Click / tap the photos to be taken to the recipe pages!) 

    Featured in this recipe: 

    Cream Cheese Buttercream Frosting


  • Ladybug Birthday Cake

    Ladybug Birthday Cake

    I still don’t know where  the year went…

    My ‘little love bug’ turned 1 a few months ago (they didn’t lie; that first year went super fast just like everyone said!) annnnd so in the month beforehand I spend ages trolling pinterest for Ladybug birthday cake ideas 🙂 

    There are SO many cute ladybug cake ideas out there! 

    I narrowed it down with 2 criteria – first, I hate sculpting cakes. Messy, wastes tons of cake, and I also hate dipping cake pops so that idea was out too. 

    Second – I needed a good-sized cake! I had about 20 people to feed at her party. So this was the cake design I went with! 

    “What do I need to make a ladybug birthday cake?” 

    • Below in the recipe card is a more detailed list, but I’ll sum up here! 
    First – some classic cake / frosting ingredients –
    • – made more simple by cake mixes, lol. I used 3 vanilla mixes with 1 1/2 cups of butter, 3 cups of buttermilk, 10 eggs, and 1 Tablespoon of vanilla extract. You need cream cheese, butter, powdered sugar, clear vanilla extract, and maybe some milk for the frosting. 
    To decorate – 
    • black gel color, green gel color, red gel color, and red and black fondant! Plus a piping bag and grass and leaf tips. I used the cake topper that came with a decorations set that I bought online. 

    To stack the cake tiers – 
    • Whether or not to put your base tier on a cake circle is up to you, but you’ll need a cake circle the size of your top tier, and 4-5 large straws or cake dowels. A ruler makes the whole process much easier! 

    “Holy smokes; these instructions go on forever. How complicated is this cake??” 

    • I know, I’m sorry! I wrote detailed instructions below, so I know it looks like a short book. :/ The length is my attempt at clarity. Honestly, you could probably skip reading most of the instructions if you watch the video. 
    • First – don’t let the instructions intimidate you! Tiers are easy to stack, and both tiers are easy to decorate! 
      As an aside – if you’re really NOT feeling stacking cake tiers, just leave them separate! Get another cake topper if you feel like it – and just save yourself the hassle! 😉 
    • If DO want to make a tiered cake but you’ve never stacked one before, I actually wrote a post detailing how to do it! Long story short, as long as your base tier is supported (I use cut-to-length coffee straws), your top tier won’t sink into it or tip. 

    “Did I see cake mixes in the recipe card? Seriously??”

    • Yup, I know. And yes, I know they don’t taste as good. For sure. I have a reason though.
    • All my ‘scratch cake purists,’ hear me out on this – I recommend using cake mixes if you want to use the top tier as a smash cake! My favorite scratch recipes are delicious, but they bake too dense for little hands to smash. After making many smash cakes over several years, I’ve had the best luck actually getting smashed smash cakes with cake mix layers. 
    • All that said – if you’d rather use a scratch recipe, here’s my favorite! A 1.5x batch of my absolute Favorite Vanilla Cake Recipe.
    • Or use your favorite cake recipe – up to you! 🙂 

    Recipe, supplies, and all my tips are below! 🙂 Enjoy!

    (Disclosure: As an Amazon associate I may earn from qualifying purchases, and my posts often contain affiliate links. If you click a link and make a purchase, I may receive a commission at no extra cost to you!) 
    Ladybug Birthday Cake pinterest pin

    Ladybug Birthday Cake

    Perfect for a 'Little Love Bug's' first birthday – don't let the tiers intimidate you; they're easy to stack and both tiers are easy to decorate!
    Prep Time1 hour
    Cook Time38 minutes
    Assembly & Decorating1 hour 15 minutes
    Total Time2 hours 53 minutes
    Course: Dessert
    Cuisine: American
    Keyword: Ladybug birthday cake
    Servings: 24 people
    Calories: 745kcal
    Author: Sarah H

    Equipment

    Ingredients

    Cake

    Frosting

    Instructions

    Cake

    • Preheat oven to 350°F. Line three 8 inch round pans and three 6 inch round pans with parchment rounds, and /or grease with non-stick or baker’s floured cooking spray.
    • Combine melted butter, buttermilk, eggs, and vanilla in a large bowl, and beat until blended. Add cake mixes and stir moistened (about 30 seconds), then beat on medium speed for 2 minutes.
    • Using a kitchen scale, pour 600 grams of batter into each of your 8” pans. Divide remaining batter evenly between the remaining two 6” pans – I had about 375 grams in each of my smaller pans. (Using the kitchen scale guarantees your layers will bake to be the same height.)
    • Bake for 35-37 minutes, (or until a skewer comes out clean). Allow cake layers to cool for 10-15 minutes on a wire cooling rack before removing from pans, and cool completely before frosting. Set in the fridge or freezer to accelerate the cooling process if desired.
    • Once the layers have fully cooled, the caramelized edges can be trimmed from the sides / top of the cake using a serrated knife if desired. Be sure the layers are completely cooled or chilled before trimming. If you try to trim the layers while they’re still warm, they will crumble and break.
      While you’re waiting…make your frosting!

    Frosting

    • Beat together softened cream cheese and butter; slowly add in powdered sugar alternating with milk until frosting reaches desired consistency. Add vanilla and salt if needed and beat until well combined.
    • (I waited until my layers were stacked and crumb-coated, then removed a third of the remaining white frosting for the top tier and green ‘grass’ border and colored the remaining frosting red for the base tier.)

    Assembly

    • Once your cakes are cool, level them (if needed/desired; these cakes usually bake fairly flat so I didn’t trim much from the tops). This can be done with a cake leveler or a large serrated knife and a ruler. Place a smear of frosting on your large cake circle (to keep the cake from sliding while you decorate it) and center your large first cake layer in the center of the circle. Spread the layer with frosting. Add your next cake layer on top, and repeat the process with your remaining 8” cake layers.
    • Next, repeat the same process with your 6" cardboard circle and cake layers. Of note – if your circles aren’t pre-center-punched, be sure to grab a dowel or scissors and make your own hole in the exact center of the 6" circle – this will allow you to center the top tier on the base tier later on.
    • Now you're ready to crumb-coat . If you're unfamiliar with crumb-coating, it's just what it sounds like – spreading a thin layer of frosting over the entire outside of the cake tiers to keep crumbs out of your final layer. Once your crumb coats have set (this takes about 10 minutes in the fridge), frost your top 6” tier white, then remove about ½ cup of frosting to color green for decorating, and color the remaining frosting red.
    • Add your final layers of frosting to both tiers and smooth (I like to use an offset spatula and bench scraper for my final frosting layers).Note – for my larger tier, I was able to smooth the frosting fairly well free-handed, but I struggled getting the sides smoothed on my smaller one. Trimming the layers just smaller than the cake circle and using the cardboard as a guide for my bench scraper worked well for smoothing the frosting on the top tier!

    Stacking the tiers

    • (Doweling a tiered cake is done to ensure that the top tier doesn’t crush the lower tier, as well as keeping it centered.) Cut four straws to the height of your base tier, and cut one at an angle for the center. Grab your ruler for this next part! Push the straws down into the base tier just over one inch from the cake edge, placing them evenly at quarter intervals around the cake. Place your last, tallest straw or dowel into the exact center of the cake, making sure to keep it straight as you press down.
    • Now you’re ready – center the hole in the bottom of your top tier cake circle over the tallest dowel and let the top tier gently down onto the base tier. The dowel will poke into the center of the top tier to hold it in place.

    Decorating

    • For the base tier polka dots, roll thin about half of your black fondant and cut about 20 1-inch circles (I used a circle cutter from this set). I spaced mine over the base tier at random, 2-3 inches apart.
    • To make the ladybugs, roll about ½ a tablespoon of fondant into an oblong circle and flatten slightly on one end. With a dab of water stick about a ½ teaspoon size ball of black fondant to the flattened end. I used a toothpick and the blunt end of a skewer to make the lines and dots on the ladybug’s back, but a paintbrush would work as well. Allow 1-2 hours to dry before transferring to the cake.
    • Now you’re ready to finish decorating! I used a piece of bent wide wire to make the little dotted lines on the side of the cake, but an angled paintbrush would work as well. I found it the easiest to put on the lines first and then the ladybugs at the ends.
    • With a leaf tip and the multi-hole grass tip (both the tips I used are in this set or you can use the Wilton grass tip and the middle tip from this set) pipe a rim of short and tall grass around the base of the top tier.
    • Last step – add your Ladybug cake topper to your top tier – and step back and admire your cake!

    Video

    Nutrition

    Serving: 1slice | Calories: 745kcal | Carbohydrates: 101g | Protein: 9g | Fat: 39g

    Did you make this Ladybug Birthday Cake?

    Let me know how it went – or make my day and find me on Pinterest or on Instagram and tag @IntensiveCakeUnit in your photo!

    Other birthday cakes ideas you may love…

    (Click / tap the photos below to be taken to the recipe pages!)