Category: Cookies & Donuts

  • Birds Nest Macaroons

    Birds Nest Macaroons

    angled view of coconut bird's nest macaroon cookies filled with cadbury mini chocolate eggs

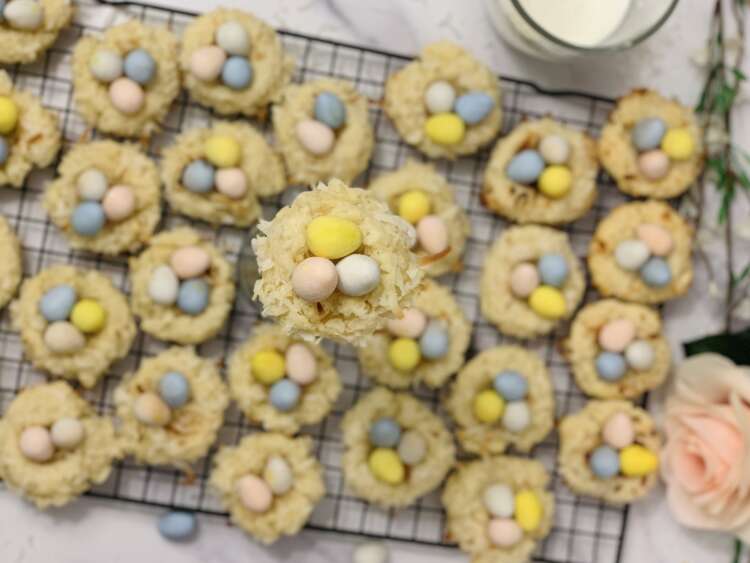
    On the hunt for an Easter egg dessert that’s easy to make, adorable, and full of delicious flavors?

    Flavored with almond and orange, stuffed full of coconut and topped with mini chocolate eggs – these Birds Nest Macaroons are a sure-to-please Easter dessert!

    The dough comes together in just 15 minutes – then after an hour of chill time, bake these tiny ‘nests’ of deliciousness, press a hole in the centers, and fill them with mini chocolate eggs! This is also a fantastic recipe to make with kids. Depending on their ages, they can help with anything from pressing holes in the centers and decorating with eggs to rolling the cookies in coconut to making the dough!

    What makes this recipe special?

    The first thing I love about this recipe is that the cookie comes out soft, not crunchy or crumbly. Maybe I’ve only ever tried over-baked macaroons, but that’s been my biggest complaint about them in general. These baked for 10-12 minutes max in my oven, and even the 12-minute pan of cookies with more toasty coconut were still soft in the centers and didn’t crumble apart. Since I’m not a fan of crumbly cookies this was a big plus for me!

    Many macaroon recipes are flavored predominantly (or exclusively) with coconut – not a bad thing, especially for coconut lovers! But this recipe also features almond and orange extracts (or orange juice concentrate) to add extra dimensions to the flavor. All three flavors pair AMAZINGLY with the chocolate eggs on top – and they look absolutely adorable to boot!

    Can I make these gluten-free?”

    Absolutely! Check labels on your ingredients, but I love making recipes gluten-free for my sisters by subbing out regular all-purpose flour for Pamela’s 1:1 gluten free flour substitute! Especially in a cookie like this one, where the texture comes more from the coconut than from the flour, it’s REALLY hard to tell the difference between a regular and a gluten-free macaroon!

    As an Amazon affiliate I may earn from qualifying purchases, and my posts sometimes contain affiliate links. If you click a link and make a purchase, I may receive a small commission at no extra cost to you! 

    Birds Nest macaroons- inside

    Don’t forget to pin this recipe for later! 😉 

    overhead view of coconut bird's nest macaroon cookies filled with cadbury mini chocolate eggs

    Bird’s Nest Macaroons

    Flavored with almond and orange, filled with coconut and topped with mini chocolate eggs – these Bird’s Nest Macaroons are a sure-to-please Easter dessert!
    Prep Time15 minutes
    Cook Time12 minutes
    Chill time1 hour
    Total Time1 hour 27 minutes
    Course: Dessert
    Cuisine: American
    Keyword: Bird’s nest cookies, coconut desserts, Coconut Easter desserts, Easter cookies, Easter egg cookies, Easy Easter Desserts
    Servings: 36 cookies
    Calories: 141.4kcal
    Author: Sarah H

    Equipment

    • 1-2 cookie sheets + liners or parchment paper
    • 1 cookie scoop (optional, but makes uniform cookies easier)

    Ingredients

    • cup butter (softened)
    • 4 ounces cream cheese (softened)
    • ¾ cup granulated sugar
    • 2 egg yolks
    • 2 teaspoons almond extract
    • 1 teaspoon orange extract (or 2 teaspoons orange juice concentrate)
    • 1 ¼ cup flour
    • 2 teaspoons baking powder
    • ¼ teaspoon salt
    • 14 ounces coconut, shredded (divided)
    • 1 bag Cadbury mini eggs (or other Easter eggs or M&Ms)

    Instructions

    Make & chill the dough

    • Cream softened butter and cream cheese together until combined. Beat in sugar until light and fluffy. Add egg yolks, almond extract, and orange extract (or concentrate); beat well.
    • Combine flour, baking powder, and salt; gradually add to butter/cream cheese mixture. Measure and mix in 3 cups coconut (save remaining coconut to roll cookies in before baking.) Cover and chill 1 hour.

    Bake

    • Shape into 1-inch balls (I used a small cookie scoop). Roll in remaining coconut. Bake at 350° for 10-12 minutes or until lightly browned.
      Remove from oven and cool 1-2 minutes; then press a small 'bird's-nest-hole' into the center of each cookie. I used the back of a vegetable peeler; any blunt-ended kitchen utensil will do.
      Fill with 2-3 Cadbury eggs per cookie. Carefully remove from cookie sheet and cool completely on wire rack.

    Video

    Notes

    (Please note nutrition information is an estimate, and may not be exactly accurate. Counts per cookie will also vary if the entire bag of coconut (or chocolate eggs) is not used.) 

    Nutrition

    Serving: 1cookie | Calories: 141.4kcal | Carbohydrates: 11.5g | Protein: 1.6g | Fat: 10.7g

    Did you make these Birds Nest Macaroons? 

    Please consider leaving a star rating and/or review at the bottom of the page – this really helps other coconut-lovers find this page! 😉 

    Please email me with any questions/comments/concerns/etc- emails through my contact form go straight to my inbox and I can see them on my phone! 

    Other recipes you may love…

  • Biscoff Stuffed Donuts

    Biscoff Stuffed Donuts

    Filled donuts have become our go-to dessert!

    Biscoff Stuffed Donuts - vanilla donuts filled with Biscoff cookie butter

    Biscoff Stuffed Donuts

    Biscoff stuffed donuts – a handful of ingredients make the absolute best homemade donuts ever. So easy my 3 year old can help!
    Prep Time20 minutes
    Cook Time10 minutes
    Decorating time25 minutes
    Total Time55 minutes
    Course: Dessert
    Cuisine: American
    Keyword: Biscoff Cake mix donuts, Biscoff cookie butter donuts, Biscoff stuffed donuts, Cake Mix Donuts
    Servings: 12 donuts
    Calories: 355kcal

    Equipment

    Ingredients

    Donuts

    Filling

    • ¾ cup Biscoff cookie butter (don't melt 1/2 cup for the filling; you'll eventually melt the last 1/4 cup for the topping)

    Glaze

    • 8 ounces cream cheese softened
    • ½ cup powdered sugar
    • 1-3 Tablespoons milk (if needed)

    Instructions

    Donuts

    • Preheat oven to 350°F. Grease donut pan(s) with baker’s floured cooking spray (or grease and sprinkle with a bit of flour). (Don't skip this step; they're a nuisance to get out of the pans if they stick!)
    • Melt butter and cookie butter together and allow to cool (so the mixture doesn't cook the eggs).
    • Whisk eggs in a large mixing bowl, and when butter/cookie butter mixture is cool beat together with eggs until fully combined.
    • Add cake mix to the bowl. (I switch to a spoon or spatula at this point.) Mix until completely combined and even in texture. (The mixture will be very thick; this is normal.)
    • Fill the base of each donut ring with 2 Tablespoons of donut mixture, and press it down into the base and slightly up the sides, creating space in the center for the cookie butter filling.

    Filling

    • Transfer 1/2 cup of cookie butter (unmelted) to a piping bag. Cut a hole in the tip of the bag about the size of a pencil. Pipe a ring of cookie butter into each donut, filling the space you made in the step above. (Use as much as you'd like; just bear in mind the more filling you use the more likely it is to leak out of the donuts as they bake.)
    • Add another 2 Tablespoons of donut mixture to the top – I did this in sections to keep the cookie butter filling inside.

    Baking

    • Bake at 350 ℉ for 10-12 minutes, until each donut is no longer sticky in the center and a toothpick comes out clean (other than the cookie butter). (10 minutes was perfect in my oven; they may look a little underdone.)

    Frosting

    • Beat cream cheese until smooth. Beat in sugar until well-combined, and add milk if needed to achieve a glaze-like consistency.
    • (You can add a bit more powdered sugar or milk if your glaze seems too thin or thick. A thick syrup-like consistency worked well for me. Too thick and it won't stick to the donuts; too thin and it runs *everywhere.*)
    • Glaze donuts either by dipping upside down in the bowl, or by transferring glaze to a piping bag and drizzling over the donuts.
    • Melt remaining 1/4 cup of cookie butter, and transfer to a piping bag with a small (skewer-sized) hole in the top. Drizzle the top of the glazed donuts – I found it looked the best when I did the drizzling in two directions.

    Video

    Notes

    (Please note nutrition information is an estimate, and may not be exactly accurate. Counts will be lower in all fields if not all the glaze is used.) 

    Nutrition

    Serving: 1donut | Calories: 355kcal | Carbohydrates: 40g | Protein: 8g | Fat: 14g
  • Filled Cake Mix Donuts

    Filled Cake Mix Donuts

    Filled Cake mix donuts - cake mix donuts with cream cheese filling

    Get the best of both worlds with these filled cake donuts!

    First – quick backstory on how these filled cake mix donuts came into being!
    Someone asked me about my favorite type of donut not too long ago. I couldn’t pick a favorite! It took me a bit thinking about it to pin down why though. I love filled donuts – because of the filling (duh).  But I love cake-style donuts because of their texture. 
    Then the idea hit – I have donut pans! Could I make a *filled* cake donut…? 
    The process – 
    Well obviously, that question needed an answer. I stocked up on a few extra cake mixes and cream cheese packages.
    Then – when work put me on call one day – recipe testing commenced! 
     
     I’ve been making baked cake mix donuts for a couple of years now. They’re so easy – I can make them with my toddler. (Which is saying something, lol. She’s very much at that ‘want to help mama with everything’ stage. Which is adorable, and I love it. Only issue is her help isn’t generally super helpful.) So – if I try and tackle anything too complicated with her help pretty soon we’re both just frustrated. 
    The results – 
    I stuck with that cake mix donut base for these filled cake mix donuts. Worked great! 
     
    Then onto the filling! Again – toddler help being what it is – I wanted to keep the filling super simple. Cream cheese and sugar made the perfect mixture – rich, sweet, delicious, and still visible after the donuts were baked. 
     
    I added a couple of tablespoons of whipping cream to the remaining cream cheese filling. It thinned it down enough to make the perfect topping for the donuts! 
     

    “What do I need to make filled cake mix donuts?”

    Not much! Donut pans, a box of cake mix, 1/2 cup of unsalted butter, 2 eggs, plus cream cheese, powdered sugar, and vanilla for the filling and topping! Cookie scoop and baker’s floured spray make the process a little easier, but are optional. I might also recommend a piping bag for filling the donuts, but a sandwich bag with a corner cut or rolled plastic wrap would work. 

    A few quick tips – 

    • Make sure you grease your pans well! It would be a huge bummer to get these baked and have them break coming out of the pans. 
    • Don’t over-bake these donuts; they tend to get on the dry side when overbaked.  
    • These donuts – as the recipe’s written – have a very dense texture. If you want a bit of a light cake-y donut add a 1/4 cup of buttermilk (or milk) to the donut mixture before baking. You just might have a touch harder time getting them filled. 
    • Should you want to skip the hassle of filling the donuts, just check out my ‘Cake Mix Donuts‘ recipe page! 
     

    Don’t forget to pin this recipe for later! 

    Filled cake mix donuts - overhead shot

    Filled Cake Mix Donuts

    Can't choose between a cake and filled donut? These filled cake mix donuts have it all – cake donut texture, filling – AND they're SO easy!
    Prep Time30 minutes
    Cook Time15 minutes
    Decorating time20 minutes
    Total Time1 hour 5 minutes
    Course: Breakfast, Dessert
    Cuisine: American
    Keyword: Baked Donut Recipes, Cake Mix Donuts, Donuts, Donuts from Cake Mix, Low Fat Donut Recipes
    Servings: 12 donuts
    Calories: 304kcal

    Equipment

    Ingredients

    Donuts

    • 1 boxed cake mix (I used chocolate; flavor's up to you!)
    • ½ cup unsalted butter (1 stick, melted and cooled)
    • 2 eggs (room temperature)

    Filling

    Glaze & decorations

    • 2-3 Tablespoons milk (add to remaining filling mixture to make glaze)
    • 1 teaspoon vanilla (add to remaining filling mixture to make glaze)
    • Sprinkle mix of your choice optional; I used a rainbow jimmies mix

    Instructions

    Donuts

    • Preheat oven to 350°F. Grease donut pan(s) with baker’s floured cooking spray (or grease and sprinkle with a bit of flour).
    • Mix together wet ingredients (eggs and butter) with a whisk or in a stand mixer with a paddle until fully combined (make sure melted butter isn’t too hot, so it doesn’t cook the eggs).
    • Add in cake mix, and mix on low speed until incorporated, and then increase speed to medium and beat for 1 minute. The mixture will be thick.
    • Fill the base of each donut ring with 2 Tablespoons of donut mixture, and press it down into the base and slightly up the sides, creating space in the center for the filling.

    Filling

    • Beat cream cheese until smooth. Beat in sugar until well-combined and not grainy.
    • Transfer ½ cup of filling into a piping or plastic bag. Pipe a ring of filling into each donut. I used about a pencil-thick ring of filling – more and it's harder to keep the filling inside the donut, but feel free to use more if you're feeling like it!
    • Add another 2 Tablespoons of donut mixture to the top – I did this in sections to keep the donut filling inside.

    Baking + Decorating

    • Bake at 350 ℉ for 10-14 minutes, until each donut is no longer sticky in the center and a toothpick comes out clean.
    • Add milk and vanilla to remaining donut filling; beat until well blended.
      (You can add a bit more powdered sugar or milk if your glaze seems too thin or thick. I hate this comparison, but an Elmer's glue consistency worked well for me. Too thick and it won't stick to the donuts; too thin and it runs *everywhere.*)
    • Glaze donuts either by dipping upside down in the bowl, or by transferring glaze to a piping bag and drizzling over the donuts. Add sprinkles if desired. And you're done! Refrigerate if not serving immediately – and enjoy!

    Video

    Notes

    (Please note nutrition information is an estimate and may not be exactly accurate. Nutrition information per donut will be less if not all the cream cheese topping is used.) 

    Nutrition

    Serving: 1donut | Calories: 304kcal | Carbohydrates: 40g | Protein: 8g | Fat: 12g

    DID YOU MAKE THESE CAKE MIX DONUTS? 

    Let me know how it went – or make my day and find me on Pinterest or on Instagram and tag @IntensiveCakeUnit in your photo!

    You can also add a comment or a recipe rating at the bottom of the page! 🙂

    OTHER RECIPES YOU MAY LOVE…

    (Click / tap the photos to be taken to the recipe pages!)

  • Confetti Chocolate Chippers

    Confetti Chocolate Chippers

    Funfetti Chocolate chip cookies - bite out of 1 cookie

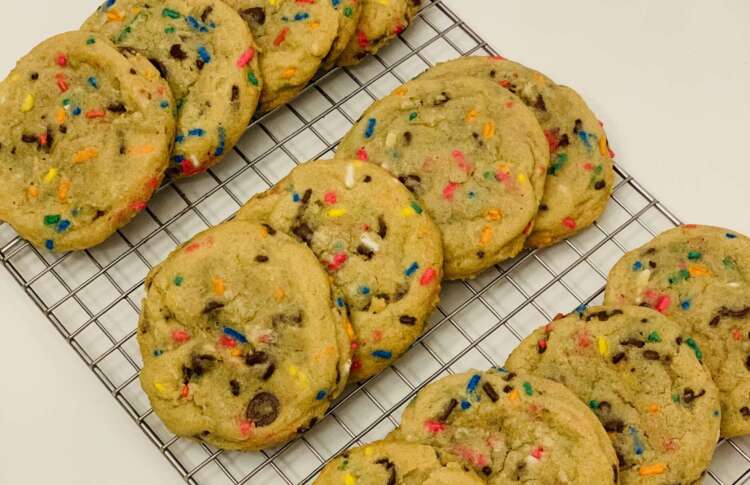
    What’s better than homemade chocolate chip cookies? 

    They really are the ultimate comfort food! They’re delightfully crispy on the outside, irresistibly gooey on the inside – a timeless classic cookie recipe! They’ve been the go-to cookie recipe in my house for as long as I can remember. 

    Whenever I make chocolate chip cookies, my sprinkle addiction comes out to play – I love adding rainbow jimmies sprinkles to bring a fun pop of confetti color to the recipe! (Absolutely feel free to leave them out or replace with a few extra chocolate or vanilla chips if you prefer 🙂  ) 

    Why you’ll love this cookie recipe! 

    • They have a perfect balance of buttery richness, a hint of vanilla, sweet chocolate chips, and a colorful splash from the confetti sprinkles!
    • Easy to tackle whether you’re a cookie novice or a seasoned baker.
    • Slightly crunchy-on-the-outside, chewy-on-the-inside deliciousness that will have everyone reaching for seconds! 
    • This cookie recipe is SURE to be a hit with the kids – I’ve still never encountered a kid that doesn’t like sprinkles. And I’ve met a lot of kids! 

    So on to the recipe – gather your ingredients, preheat your oven, get ready to turn out the best Confetti Chocolate Chip cookies you’ve ever eaten! 

    What do I need to make Confetti Chocolate Chippers?

    The classic cookie ingredients – Butter, brown sugar, granulated sugar, eggs, vanilla, flour, baking soda, salt – and sprinkles!

    These are the kitchen staples you’ll need to make the best chocolate chip cookies of your life:

    Butter + sugars: This classic recipe begins with two sticks of butter creamed with both brown and white sugars. The blend of sugars creates a perfectly balanced flavor.

    Eggs: Eggs add moisture and act as a binding agent, which means they help hold the dough together.

    Vanilla: Vanilla extract enhances the overall flavor of the chocolate chip cookies. I highly recommend Mexican vanilla extra if you can get it – it adds more depth to the flavor and really makes the flavor profile of these cookies pop. The extra moisture also helps create steam as the cookies bake, working with baking soda to help the cookies puff up.

    Baking soda: Baking soda reacts in the oven to help the cookies puff and rise.

    Salt: A bit of salt enhances the flavors of the other ingredients (with only a half teaspoon it won’t make the cookies too salty.)

    Flour: All-purpose flour helps create gluten, which adds structure to the cookie dough.

    Chocolate chips: Of course, you’ll need chocolate chips! Semisweet is my personal favorite for these cookies. You can use dark or milk chocolate chips if you prefer – or a blend of any of the three!

    (Disclosure: As an Amazon associate I may earn from qualifying purchases, and my posts often contain affiliate links. If you click a link and make a purchase, I may receive a commission at no extra cost to you!) 

    Don’t forget to pin this recipe for later! 

    Confetti Chocolate Chippers pinterest pin

    Confetti Chocolate Chippers

    What’s better than homemade chocolate chip cookies? They really are the ultimate comfort food – delightfully crispy on the outside, irresistibly gooey on the inside! Whenever I make chocolate chip cookies, my sprinkle addiction comes out to play – I love adding rainbow jimmies sprinkles to bring a fun pop of confetti color to the recipe!
    Absolutely feel free to leave them out or replace with a few extra chocolate or vanilla chips if you prefer 🙂
    Prep Time30 minutes
    Cook Time12 minutes
    Cooling time5 minutes
    Total Time47 minutes
    Course: Dessert
    Cuisine: American
    Keyword: Chocolate Chip cookies, Chocolate Chippers, Confetti Chocolate Chip Cookies, Confetti Chocolate Chippers
    Servings: 30 cookies (depending on size)
    Calories: 120kcal

    Equipment

    Ingredients

    • 1 cup butter (2 sticks, softened)
    • 1 cup brown sugar
    • ¾ cup granulated sugar
    • 2 eggs (room temperature)
    • 1 teaspoon vanilla extract (I recommend Mexican vanilla extract for these cookies; it really does add to the flavor!)
    • 3 cups flour
    • 1 teaspoon baking soda
    • ½ teaspoons salt
    • ½ cup rainow jimmies sprinkles (Not nonpareils; the color will dissolve and turn the dough a weird ugly gray-brown color. :/ )

    Instructions

    • Preheat the oven to 350 ℉ (175 ℃).
    • In a large mixing bowl, beat together butter, white sugar, and brown sugar with a hand mixer (or beat in a stand mixer with the paddle attachment). Beat on medium-high speed until lightened, well-creamed, and smooth. (This should take about 4-5 minutes.)
    • Beat in eggs one at a time, beating at least one minute after each addition. Beat in vanilla.
    • Add baking soda and salt to flour in a separate bowl, and mix to combine. Add flour mixture to butter/sugar mixture, and mix until combined and no dry flour remains. Stir in chocolate chips and rainbow jimmies sprinkles. The dough should be quite thick; this is normal. 🙂
    • Transfer with a cookie scoop to baking sheet(s); bake in preheated oven for 12-15 minutes until lightly golden. Bake a few minutes longer if you prefer crispy cookies. (Please note smaller cookies will take less baking time.)
    • Remove from oven and cool 4-5 minutes before transferring to wire cooling racks (or before eating!) – this will keep them from deforming or tearing when they’re moved.
    • Serve and enjoy!

    Video

    Nutrition

    Serving: 1cookie (1/30th recipe) | Calories: 120kcal | Carbohydrates: 16g | Protein: 2g | Fat: 5g

    Did you make these Confetti Chocolate Chippers? 

    Send me an email and let me know how it went – or make my day and find me on Pinterest or on Instagram and tag @IntensiveCakeUnit in your photo!

    You can also add a comment or a recipe rating at the bottom of the page! 🙂

    Other recipes you may love…

    (Click / tap the photos to be taken to the recipe pages!)

  • Crème Brûlée Cookies

    Crème Brûlée Cookies

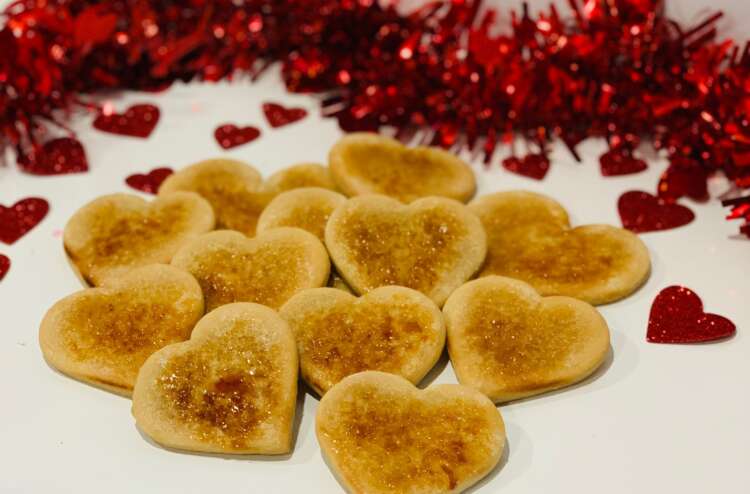
    Where are my fellow Crème Brûlée lovers…? 

    Can you ever go *wrong* with Crème Brûlée – or with sugar cookies? Because I’m 99.9% sure there’s not really a time of year they don’t work as a dessert that everyone loves! 

    These cookies are my favorite sugar cookie of ALL time. I love the deeper flavors the brown sugar and cream cheese gives them, and the cream cheese keeps they from getting too dry! Since you can up the flour a bit and skip the chilling if your time is limited, these are my go-to if I don’t have tons of time!

    You can always decorate these cookies just by icing them, buuut I use ANY and all excuses to bust out my brûlée torch, and the caramelized sugar adds a fun texture and caramelized crunch to the tops of the cookies. Enjoy!

    Why make these Crème Brûlée cookies? 

    • Rich, delicious never-dry sugar cookie base 
    • Touch of butter and superfine sugar combine on top of the cookie to form an AMAZING caramelized crunchy bruleed layer! 
    • Honestly – much easier way to decorate cookies than piping them! 
    • You get to decorate with FIRE!! Let’s not forget that one, lol. 
    FAQS
    “Can I make these without a brûlée torch?” 

    You can! You can cover the tops of the cheesecakes with sugar, and place them in an oven on the broil setting – or I’ve even heard of people using a flamethrower or lighter! The downside is just that you’ll have less control with those methods than you have with a brulee torch. So it may be harder to get an even caramelized coating without bits of it burning.
    The torch I used and the butane fuel bottle (that’s lasted over 4 years as I update this post) are still available on Amazon. Last time I price-checked (2023) you could buy both for less than $25! 

    (Disclosure: As an Amazon associate I may earn from qualifying purchases, and my posts often contain affiliate links. If you click a link and make a purchase, I may receive a commission at no extra cost to you!) 

    Don't forget to pin for later! 

    Creme Brulee Cookies pinterest pin

    Crème Brûlée Cookies

    Bored with classic cookie designs? Grab a brûlée torch! These Crème Brûlée cookies have a beautiful caramelized look - and taste!
    Prep Time1 hour
    Cook Time7 minutes
    Decorating time30 minutes
    Total Time1 hour 37 minutes
    Course: Dessert
    Cuisine: American
    Keyword: Bruleed sugar cookies, Caramelized sugar cookies, Creme brulee cookies, Creme Brulee sugar cookies, Unique cookie decorating
    Servings: 24 cookies (varies)
    Calories: 175kcal
    Author: Sarah H

    Equipment

    • Brulee torch (or oven set to broil, but a torch is much easier! Depending on your torch you may also need butane fuel, available inexpensively online)
    • Rolling Pin
    • Cookie cutters

    Ingredients

    Crème Brulée cookies

    • 4 ounces cream cheese (softened)
    • ¾ cup unsalted butter (or 1 ½ sticks, softened)
    • 1 cup brown sugar
    • ¼ cup granulated sugar
    • 2 teaspoons clear vanilla extract
    • 1 teaspoon lemon juice
    • 2 eggs
    • 3 cups all-purpose flour (3 ½ if your chilling time is limited)
    • 2 teaspoon baking powder
    • ¼ teaspoon salt

    Brulee topping

    • 2 Tablespoons butter
    • 1 cup Baker’s Superfine sugar granulated sugar will kind of work, but it's harder to caramelize without burning. You can find it in some stores, buy it here on Amazon, or make your own by putting granulated sugar in a food processor.

    Instructions

    Crème Brulée cookies

    • Preheat oven to 425F.
    • Mix in order given, beating cream cheese and butter together well before adding sugars. Chill 1-2 hours before rolling if time allows; if not add an extra ½ cup of flour to your dough.
    • Roll out to about ¼ inch thick, and use extra flour when rolling or your dough will stick. I also recommend parchment paper or these silpat mats to keep your cookies from sticking to the baking sheets!
    • Bake 5-7 minutes, until lightly browned at the edges. Cool completely before decorating.
    • (Will keep 2-3 days well-wrapped at room temperature, up to 7 in the fridge before decorating.)

    Brulée instructions

    • (When you’re ready to decorate, I recommend a quick watch through the video for reference; it's less than a minute long!)
    • Spread a thin layer of butter over the top of each cookie - so that the sugar will stick to the top of the cookie and caramelize rather than just burning the top of the cookie. (If you want a slightly sweeter cookie, spread a thin layer of frosting over each cookie before adding the sugar - here's my favorite Cream Cheese Buttercream Frosting.)
    • Sprinkle about a teaspoon of sugar evenly onto each cookie, and place on a heat-resistant surface like a plate or baking sheet. Light your brulée torch and evenly fire each cookie until the sugar melts and then crystallizes. I often do 3-4 at a time to save time/fuel and keep from burning them! Add additional sugar to any spots that are thin or starting to burn.
    • Allow to cool until the caramelized sugar hardens – then enjoy!

    Video

    Notes

    Note – recipe credit where it's due - the cookie base in this recipe is a slightly-modified hand-me-down recipe from my mom. 🙂 
    (Please note nutrition information is an estimate and may not be exactly accurate.)

    Nutrition

    Serving: 1cookie (varies w/size) | Calories: 175kcal | Carbohydrates: 26g | Protein: 3g | Fat: 8g

    Did you make these Crème brûlée Cookies?

    Let me know how it went - or find me on Pinterest or on Instagram and tag @IntensiveCakeUnit in your photo!

    You can also add a comment or a recipe rating at the bottom of the page! 🙂

    Other recipes you may love…

    (Click / tap the photos to be taken to the recipe pages!)

  • Dipped Sugar Cookies

    Dipped Sugar Cookies

    Can you *ever* go wrong with cookies? 😉

    I think every season is cookie season. (And I think I'd have trouble finding someone to disagree with me.) Cookies are quick and simple to make, and generally don't require a lot of time. Plus they're fun, easy to transport, and always a crowd-pleaser dessert! 

    My one issue with sugar cookies...? The one batch I made to order I hand-outlined and flood-filled - and HOLY smoke. It took me approximately an ETERNITY. Maybe longer. 

    So when I had a 'finger food' dessert I needed to make for a Christmas party - I re-thought my decorating method! 

    Hallelujah; dipped cookies looked almost identical to the ones I hand-outlined and flood-filled. (Not surprising really, since I'm not that good at it.) But dipping was also a million times faster! I also had fun marbling the icing with a couple of different colors, and it was so simple to do! 

    FAQs - 

    "Why is this sugar cookie recipe special?"

    This cookie recipe makes my absolute favorite sugar cookies by far – I love the deeper flavors the brown sugar and cream cheese gives the cookie, and the cream cheese keeps they from getting dry. You can even get away with upping the flour a bit if your chilling time is limited, so these are still my go-to if I don’t have tons of time! Dipped sugar cookies are the way to go! 

    "Can I change the cookie or icing flavors?"

    Absolutely! I used vanilla flavoring for the cookies and icing in this recipe, but you can easily substitute lemon, orange, almond, or even peppermint extracts! (I love peppermint cookies around Christmas-time!) 

    Another decorating option - these cookies taste *fantastic* dipped in chocolate! 

    "What if I want to decorate with royal icing?" 

    More power to you! Go for it!

    I'll be honest and say that royal icing has never been my jam; something to do with the egg whites. It looks absolutely gorgeous and I get why people use it - but that's why you don't see it in my recipe. But you can absolutely use it; as far as I know there should be any difference in the dipping process! 

    Actually - my favorite frosting to decorate with is mostly-melted cream cheese buttercream. It goes on thicker but smoothes out pretty well - and it tastes INCREDIBLE. 

    "What if I want to decorate with buttercream?" 

    Again - more power to you! Absolutely! I actually love decorating these with cream cheese buttercream. Whether I'm up to piping them is hit or miss depending on the day (and whether my kids decide they're going to nap or not).

    That said - one more option! Hear me out here - you can use the dipping method with buttercream frostings too! I've melted the cream cheese buttercream I mentioned above in small bowls in the microwave and dipped them that way. (I had a small army of tiny children decorating cookies at my table and needed to get them iced quickly!) That evening a text came in from one of my mom friends - "My husband said that's the best sugar cookie he's ever eaten!" 

    Will happily acknowledge that's a real take-it-or-leave-it style tip, but it worked for me! Take it for what it's worth. 😉 

    Annnd I think that wraps up the FAQs! On to the recipe - happy baking!! 

    (Disclosure: As an Amazon associate I may earn from qualifying purchases, and my posts often contain affiliate links. If you click a link and make a purchase, I may receive a commission at no extra cost to you!) 

    Don't forget to pin this recipe for later!

    Dipped Sugar Cookies pinterest pin

    Dipped Sugar Cookies

    Does decorating sugar cookies take you tons of time? Dipping them in icing is SO much faster - and creates beautiful cookies!
    Prep Time30 minutes
    Cook Time7 minutes
    Decorating time30 minutes
    Total Time1 hour 7 minutes
    Course: Dessert
    Cuisine: American
    Keyword: Dipped Sugar cookies, Easy to decorate Sugar cookies, Glazed Sugar Cookies, Simple Sugar Cookies
    Servings: 24 cookies (varies)
    Calories: 175kcal
    Author: Sarah H

    Equipment

    • Cookie cutters
    • Rolling Pin

    Ingredients

    Sugar cookies

    • 4 ounces cream cheese (softened)
    • ¾ cup unsalted butter (or 1 ½ sticks, softened)
    • 1 cup brown sugar
    • ¼ cup granulated sugar
    • 2 teaspoons clear vanilla extract
    • 1 teaspoon lemon juice
    • 2 eggs
    • 3 cups all-purpose flour (3 ½ if your chilling time is limited, + a bit extra to roll out the dough)
    • 2 teaspoon baking powder
    • ¼ teaspoon salt

    Powdered Sugar Icing:

    Instructions

    Sugar Cookies

    • Preheat oven to 425F℉. Mix in order given, beating cream cheese and butter together well before adding sugars. Mix in remaining ingredients in order given. (A stand mixer makes this easy!) Chill 1-2 hours before rolling if time allows; if not add an extra ½ cup of flour to your dough.
    • Roll out to about ¼ inch thick, and use extra flour when rolling to keep dough from sticking. I also recommend parchment paper or these silpat mats to keep your cookies from sticking to the baking sheets!
    • Bake 5-7 minutes, until lightly browned at the edges. Cool completely before decorating.

    Powdered Sugar Icing

    • (When you’re ready to decorate, you have a lot of options! I prefer powdered sugar + water cookie icings. Not a royal icing fan - I get weirded out putting egg into icing I'm not going to cook. That said, I know many cookie decorators use Royal Icing – here's Alton Brown’s Royal Icing recipe if you'd rather use that!)
    • Combine powdered sugar, water, and vanilla in a small bowl and beat with a whisk until well-combined and no lumps of powdered sugar remain.

    Decorating

    • (Give the video a quick watch for reference; it's less than a minute long!) My favorite decorating method is to marble some food color into my icing and then dip my cookies! Dip into the icing holding as flat as possible, then hold up at an angle to allow excess frosting to run off. Place flat until icing has set and dried.
    • You can also transfer icing to a small piping bag and drizzle to decorate.
    • (If you'd rather pipe them with frosting, this is my favorite Cream Cheese Buttercream Frosting.)
    • Enjoy! Will keep 2-3 days well-wrapped at room temperature, up to 7 well-wrapped in the fridge.

    Video

    Notes

    Note – recipe credit where it's due - the cookie base in this recipe is a slightly-modified hand-me-down recipe from my mom. 🙂 
    (Please note nutrition information is an estimate and may not be exactly accurate.)

    Nutrition

    Serving: 1cookie | Calories: 175kcal | Carbohydrates: 26g | Protein: 3g | Fat: 8g

    Did you make these Dipped Sugar Cookies? 

    Let me know how it went - or find me on Pinterest or on Instagram and tag @IntensiveCakeUnit in your photo!

    You can also add a comment or a recipe rating at the bottom of the page! 🙂

    Other recipes you may love…

    (Click / tap the photos to be taken to the recipe pages!)