Tag: how to make a geode cake

  • Geode Cake

    Geode Cake

    The endlessly-trending geode cake! 😉 

    First – quick story (read: cautionary tale :cough:)

    Several years ago, I tried as a (clueless) newbie baker to make a geode cake.

    I apparently thought just adding food color to rock candy crystals and placing them onto the cake would work… (?) If you’re thinking ‘that doesn’t sound like a great idea’ you’re 100% correct. I’m not quite sure where I got this idea. But it didn’t work out well and I definitely don’t recommend it! 

    I finally found a picture – and you can see for yourself, the result was far from beautiful. Actually – it looked looked kinda awful. See below. I’m not joking. Or even exaggerating. 

    So – all of that said – if you’re reading this post with plans to make a geode cake –  you’re you’re already way ahead of me! 😉  

    Learn from my mistakes and color the rock candy AFTER you put it on the cake

    Why make a geode cake? 

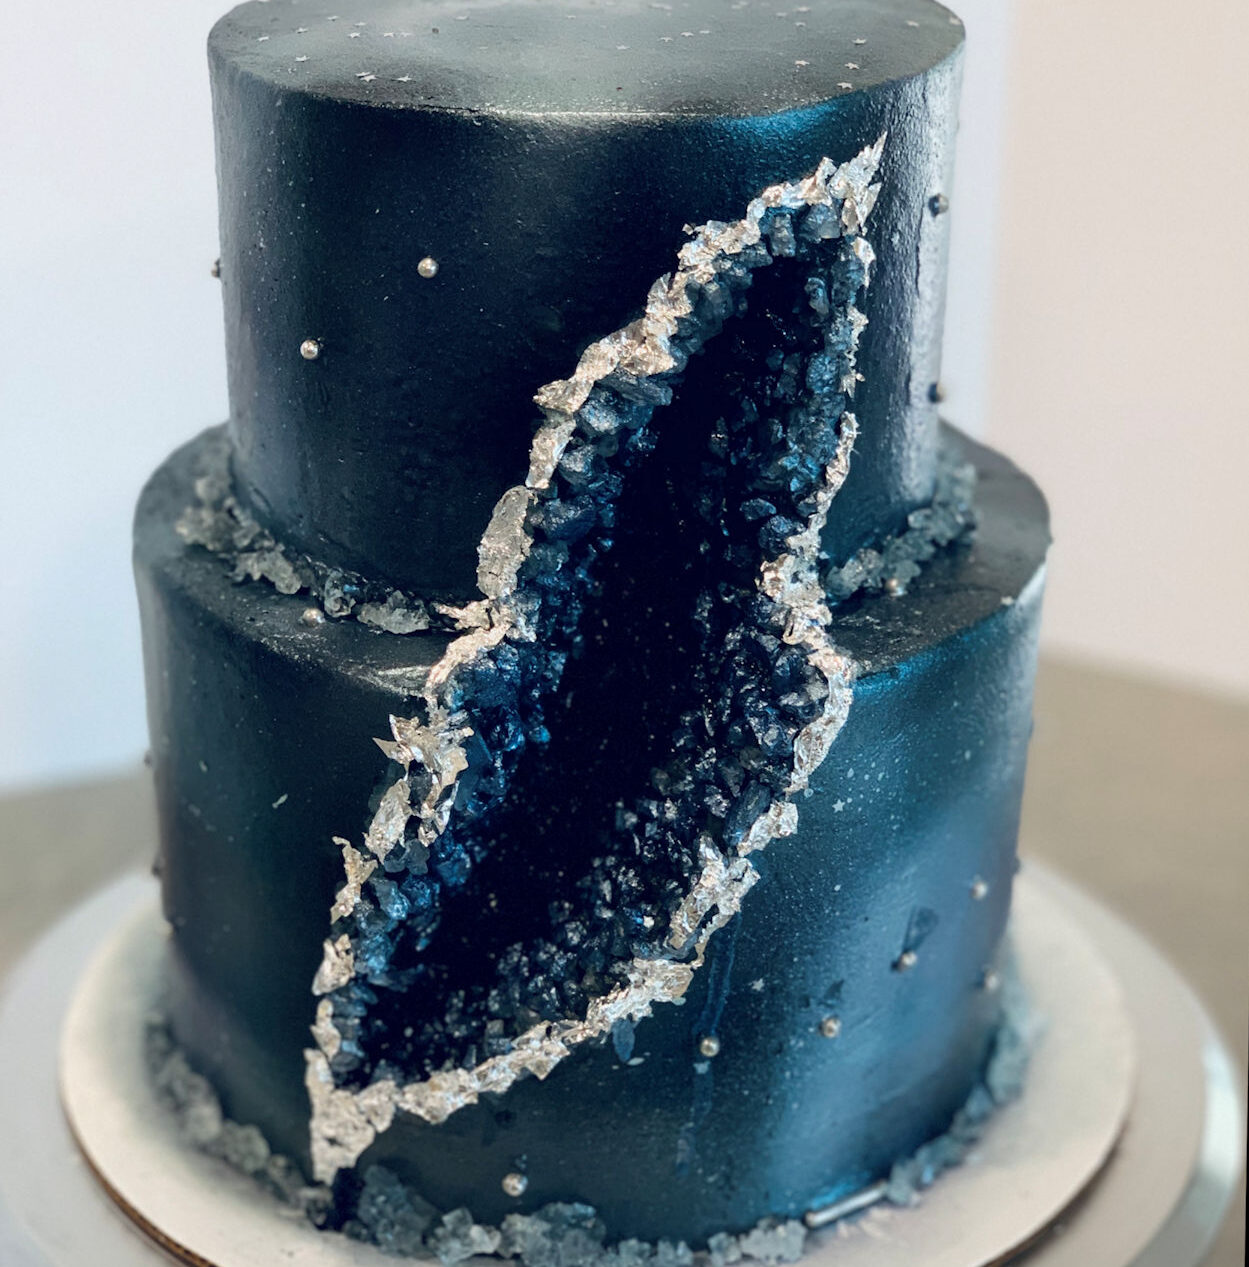
    Geode cakes are beautiful! They’re fascinatingly unique and really a fun decorating project. Geode cakes feature a beautiful a stunning crystal-like design made with rock candy (or isomalt sugar). Every one is as unique as a real geode, and they are so fun to decorate! 

    The distinctive geode shape and design is made by – 

    • cutting a geode shape out of a frosted cake 

    • coating the inside of the geode with frosting (to adhere the rock candy) 

    • placing rock candy inside the geode, covering the inside of the cavity 

    • using food coloring to add color and depth to the geode shape! 

    • Adding any extra decorations to the outside of the geode and the rest of the cake! You can use decorations like gold or silver leaf, edible paint, or food-safe flowers. 

    “Can I use a different cake or frosting recipe?” 

    • Absolutely! I’ll just make a couple of quick recommendations – 
    • I’d recommend picking a cake recipe that’s not too crumbly. Cutting out the geode shape and re-frosting that spot can be a  bit of a bugger. It’ll be harder if you have cake layers that are really soft or crumble easily.
    • I’d also recommend going with a frosting recipe / color that’s going to give you a good amount of contrast with your geode color

    Annd….I think that covers everything I have to tell you! On to the recipe! 


    (Disclosure: As an Amazon associate I may earn from qualifying purchases, and my posts often contain affiliate links. If you click a link and make a purchase, I may receive a commission at no extra cost to you!) 

    Geode cake fail…I didn’t lie, did I? Not beautiful.

    Don’t forget to pin for later!

    Geode Cake pinterest pin

    Geode Cake

    Want to know how to make a deliciously gorgeous trendy geode cake? Recipe, tools, tips, and tricks inside!
    Prep Time30 minutes
    Cook Time37 minutes
    Decorating time1 hour
    Total Time2 hours 7 minutes
    Course: Dessert
    Cuisine: American
    Keyword: Geode Cake, Geode Cake Tutorial, Make a Geode Cake
    Servings: 16 servings
    Calories: 769kcal
    Author: Sarah H

    Ingredients

    Geode Cake Layers

    • 3 ¼ cup all-purpose flour
    • 3 cup granulated sugar
    • 2 ½ teaspoon baking powder
    • 1 teaspoon salt
    • 1 cup unsalted butter or 2 sticks room temperature
    • 1 ½ cups buttermilk room temperature
    • 5 eggs
    • 2 teaspoons clear vanilla extract

    Cream Cheese Buttercream Frosting

    • 8 ounces cream cheese one package; softened
    • 1 cup butter two sticks, softened
    • 6 cups powdered sugar
    • 2-4 Tablespoons milk
    • 1 Tablespoon clear vanilla extract
    • ¼ teaspoon salt if using unsalted butter
    • 3-4 drops teal gel food coloring optional; save and add later for cake filling

    Geode / Decorations

    Instructions

    Geode Cake Layers

    • Preheat oven to 350°F. Prepare three 8 inch round pans with baker’s floured spray (or grease and line with parchment rounds).
    • Mix together all dry ingredients (flour, sugar, baking powder, and salt) in a stand mixer with a paddle until fully combined. Mix chunks of room-temperature butter slowly into the dry mix, on a low speed. Continue to mix until no large chunks of butter remain, and the mixture becomes crumbly.
    • Pour in eggs and mix on low until just incorporated. Mix in the buttermilk and vanilla on a low speed until fully incorporated. Scrape down the sides of the bowl with a spatula, then beat on medium speed for about 30 seconds.
    • Divide batter evenly between the prepared cake pans (I find a kitchen scale helpful for this part). This guarantees your layers will bake to be the same height.
    • Bake for 34-37 minutes (or until a toothpick comes out clean). Allow cake layers to cool for 10-15 minutes on a wire cooling rack before removing from pans. Cool completely before frosting. Set in the fridge or freezer to accelerate the cooling process if desired. (This is a great time to make your frosting!)
    • Once the layers have fully cooled, the caramelized bits can be trimmed from the sides / top of the cake using a serrated knife if desired. Be sure the layers are completely cooled or chilled before trimming. If you try to trim the layers while they’re still warm, they will crumble apart.

    Cream Cheese Buttercream Frosting

    • Beat together softened cream cheese and butter; slowly add in powdered sugar alternating with milk until frosting reaches desired consistency. Add vanilla and salt if needed and beat until well combined.

    Assembly

    • Once your cakes are cool, level them (if needed) Place a smear of frosting on your large cake circle (to keep the cake from sliding while you decorate it) and center your large first cake layer in the center of the circle. Spread the layer with frosting, or add a small ‘rim’ of white frosting and fill with teal frosting. Add your next cake layer on top, and repeat the process with your remaining cake layers.
    • Now you’re ready to crumb-coat . If you’re unfamiliar with crumb-coating, it’s just what it sounds like – spreading a thin layer of frosting over the entire outside of the cake tiers to keep crumbs out of your final layer.
    • Once your crumb coat has set (this takes about 5-10 minutes in the fridge), add your final layer of frosting and smooth. I like to use a large offset spatula and pastry cutter/bench scraper for this part.
    • Now the FUN part! Carve your ‘geode’ shape! Cut an irregular shape out of the side of the cake – I shot for a few inches across at the widest point, but you can make the geode as wide or narrow as you choose.
    • With a small offset spatula, re-crumb-coat the geode ‘hole.’ This will keep crumbs in and hold your rock candy in place.
    • Press rock candy crystals into the frosting to cover the base of the geode ‘hole.’ (If your geode is very narrow, tweezers may help to place candy in the deepest parts.)
    • To color the geode, use a bit of teal gel color with a bit of vanilla extract (so it dries more quickly) and brush into the center/deepest part of the geode. Add a lot of color at the center and continue to thin the color with vanilla extract to make it progressively lighter toward the outer edges.
    • Rim the outside of the geode with bits of edible silver leaf – I tried a few methods for transferring it, because it’s fragile and a bit finicky. Tearing off and moving bits at a time with a dry paintbrush has been my favorite method so far!
    • Finish it off with a few extra pieces of silver leaf and some silk flowers if you’d like – and you’re done!

    Video

    Notes

    Please note nutrition information is an estimate and may not be exactly accurate. 

    Nutrition

    Serving: 1slice | Calories: 769kcal | Carbohydrates: 100g | Protein: 9g | Fat: 37g

    Mentioned in post – 
    Cream Cheese Buttercream Frosting

    Did you make a Geode cake, or have any comments or questions? 

    Send me an email and let me know how it went – or make my day and find me on Pinterest or on Instagram and tag @IntensiveCakeUnit in your photo!

    You can also add a comment or a recipe rating at the bottom of the page! 🙂

    Other recipes you may love…

    (Click / tap the photos to be taken to the recipe pages!)

  • Galaxy Geode Cake

    Galaxy Geode Cake

    Galaxy cakes, metallic accents, and the never-ending geode cake trend…

    ….if you love any or all of those things, then THIS is the cake for you! 

    Why make this galaxy geode cake? 

    I won’t lie; this one takes several steps to come together – but once it’s done it is a SHOWSTOPPER! 
    I used spray-on colors to get that ‘galaxy color’ effect on the outside – this means you don’t have to add so much color to the frosting, so it doesn’t alter the taste much. 
    This recipe features coconut rum, blue curacao, and some grenadine – inspired by a purple ‘galaxy’ cocktail – to the cake batter and as a drizzle after baking for an extra kick of flavor. If that’s not your style though (or you’re serving to an under-21 crowd) just replace them with buttermilk in the cake batter and leave out the drizzle. 

    Cake tips! 

    Tip 1! Airbrushing is SO fun; don’t let it intimidate you! 😉 Links to the tools I used are below; my entire kit when I did my first cake was less than $60! But cake sprays will work if you’re not feeling the airbrush. 

    Tip 2! Confession time…I tried ONE geode cake as a brand new baker thinking just using colored rock candy would work…? Nope! It looked frickin awful. I’d show you a picture but I couldn’t find one, so I either took none or deleted them all. :/ Learn from my mistakes and color the rock candy AFTER you put it on the cake! 

    Tip 3! Don’t be intimidated by the tiers! They’re really as simple as cutting down a few straws, stuffing them into the cake layers, and then lining up the top cake over your center straw. 😉 However, if you’d rather just do a single cake, here’s a link to a scaled recipe for my favorite Vanilla Cake Layers!

    FAQs: 

    “WOW. Soo many steps! Any way to simplify this recipe?” 
    • Short answer – yes!  At the same time – really it’s not as bad as it looks, lol. The cake recipe looks long as heck just because I flavored it with three different ingredients and added four different gel colors. Nothing complicated. That said though – 

    • You can simplify the cake layers by substituting 3 of your favorite cake mixes plus the ingredients the mix calls for. keep the baking pans the same! (Replace 1 cup of the liquid with 1/3 cup each rum, blue curacao, and grenadine, and add gel colors after mixing. Keep the baking pans the same.) 

    • To all my ‘scratch cake recipe purists’ – just pretend you didn’t read that last bit, okay? 😉 
    • The other way to simplify this recipe is just to spread the work out. You can totally prep the cake layers and frosting ahead of time! 
    • You can store them either in the fridge (3-4 days) or in the freezer (3-4 months). Just make sure they’re well-covered / wrapped so that they’re protected from drying out. 
    • (I don’t recommend freezing this cake once decorated because the colors are likely to run as the cake thaws). 
      On a related note – cover any remaining cake well after serving to keep it from drying out – it will keep at room temperature for 2-3 days or in the fridge for 3-5 days. 

    (Disclosure: As an Amazon associate I may earn from qualifying purchases, and my posts often contain affiliate links. If you click a link and make a purchase, I may receive a commission at no extra cost to you!) 

    Galaxy Geode Cake pinterest pin

    Galaxy Geode Cake

    Grab some edible cake spray (or an airbrush if you're feeling fancy)! Here's the recipe you need to make a showstopping Galaxy Geode Cake!
    Prep Time30 minutes
    Cook Time37 minutes
    Decorating time45 minutes
    Total Time1 hour 52 minutes
    Course: Dessert
    Cuisine: American
    Keyword: Geode Cake, Galaxy Geode Cake, Tiered Geode Cake
    Servings: 24 servings
    Calories: 755kcal
    Author: Sarah H

    Equipment

    Ingredients

    Galaxy Geode Cake layers

    Cream Cheese Buttercream frosting

    • 12 oz cream cheese (1 1/2 packages; softened)
    • 1 ½ cup three sticks butter, softened (3 sticks, softened)
    • 9 cups powdered sugar
    • 1 Tablespoon clear vanilla extract
    • ¼ teaspoon salt if using unsalted butter
    • 3-5 Tablespoons whipping/heavy cream
    • 2-3 drops black gel food color

    Cake drizzle (optional)

    • 1/3 cup Malibu Coconut Rum
    • 1/3 cup blue Curacao
    • 1/3 cup grenadine

    Decorations

    • Rock candy crystals (I also found a pair of tweezers handy for placing rock candy into the ‘geode’ base)
    • Edible silver leaf (I bought mine from Gold Leaf Factory via Amazon)
    • Silver sprinkle mix (optional; to add sprinkle ‘stars’ to the cake)

    Instructions

    Cake layers

    • Preheat oven to 350°F. Prepare three 8-inch cake pans and two six-inch cake pans with baker’s floured cooking spray, or grease and line with parchment rounds.
    • Mix together all dry ingredients (flour, sugar, baking powder, and salt) in a stand mixer with a paddle until fully combined. Mix bits of room-temperature butter slowly into the dry mix, on a low speed. Continue to mix until no large chunks of butter remain, and the mixture becomes crumbly.
    • Pour in egg whites and mix on low until just incorporated. Mix in the buttermilk, rum, blue curacao, and grenadine on a low speed. Add in vanilla and oil, and mix on low until fully incorporated. Scrape down the sides of the bowl with a spatula, then beat on medium speed for about 30 seconds.
    • Divide batter evenly between the prepared cake pans (I find a kitchen scale helpful for this part – I had 675g in my large pans and about 450 in my smaller ones). This guarantees your layers will bake to be the same height.
    • Time to add in the colors! With a toothpick, skewer, or butter knife, add a drop of two of each gel color to each cake pan, and swirl them together with a butter knife.
    • Bake for 34-37 minutes, (or until a toothpick comes out clean). Allow cake layers to cool for 10-15 minutes on a wire cooling rack before removing from pans. Place cake layers into the freezer for 45 minutes, to accelerate the cooling process.
    • Once the layers have fully cooled, they can be leveled and any caramelized bits can be trimmed from the sides / top of the cake using a serrated knife if desired. Be sure the layers are completely cooled or chilled before trimming. If you try to trim the layers while they’re still warm, they will crumble apart. (This is a great time to make your frosting!)

    Cream Cheese Buttercream frosting

    • Beat together softened cream cheese and butter; slowly add in powdered sugar alternating with milk until frosting reaches desired consistency. Add vanilla, gel color, and salt if needed and beat until well combined.

    Assembly

    • (I wanted a bit more liqueur kick to my cake layers, so I used a squeeze bottle to infuse each one with a few tablespoons of the rum/curacao/grenadine mix above. Optional but delicious! 😉 )
    • Place a smear of frosting on your large cake circle (to keep the cake from sliding while you decorate it) and center your large first cake layer in the center of the circle. Spread the layer with frosting). Add your next cake layer on top, and repeat the process with your remaining cake layers.
    • Next, repeat the same process with your smaller cardboard circle and cake layers. Of note – if your circles aren’t pre-center-punched, be sure to grab a dowel or straw and make your own hole in the exact center of the circle! This will allow you to easily center the tier on the base tier later on.
    • Now you’re ready to crumb-coat . If you’re unfamiliar with crumb-coating, it’s just what it sounds like – spreading a thin layer of frosting over the entire outside of the cake tiers to keep crumbs out of your final layer.
    • Once your crumb coat has set (this takes about 5-10 minutes in the fridge), add your final layers of frosting and smooth. I like to use a large offset spatula and pastry cutter/bench scraper for this part.
    • (For my larger tier, I was able to smooth the frosting fairly well free-handed, but I struggled getting the sides smoothed on my smaller one. Trimming the layers just smaller than the cake circle and using the cardboard as a guide for my bench scraper worked well for smoothing the frosting on the top tier!)

    Okaaay. The stacking process!

    • How to Make a Tiered Cake’ by Chelsweets is still my favorite video tutorial to date – sometimes seeing the process can be very helpful!
    • Basically, doweling a tiered cake is done to ensure that the top tier doesn’t sink into the lower tier, as well as keeping it centered. I used four shorter cut-to-height plastic straws for my base tier dowels, and one taller one cut at an angle in the center to hold my top tier in place.
    • Grab your ruler for this next part! Push the straws/dowels (cut to the height of the cake) down into the base tier just over one inch from the cake edge, placing them evenly at quarter intervals around the cake. Place your last, tallest straw or dowel into the exact center of the cake, making sure to keep it straight up as you press down. Now you’re ready – center the hole in the bottom of your top tier cake circle over the tallest dowel and let the top tier gently down onto the base tier. The dowel will poke into the center of the top tier to hold it in place.
    • (I could still see my cardboard cake circle a bit, so I covered it up with some rock candy.)

    Cutting the geode

    • Cut a slanted geode shape out of the side of the cake – I shot for about 1” from the top and 1” from the cake base for the ends, and made two cuts connecting my end points. I made the opening deepest toward the center, probably 1 ½” at its deepest. (Feel free to eat the cake scraps!) I had to use a pair of scissors to cut out a bit of the 6″ cake circle too.
    • With an offset spatula, re-crumb-coat the geode ‘hole.’ (This will keep crumbs in and later hold your rock candy in place.)

    Now the most fun part! The galaxy colors!

    • (I used this airbrush kit (surprisingly inexpensive; it’s a great airbrush kit for a beginner) but it's quicker and less expensive to use edible cake sprays.)
    • Spray colors onto the side of the cake – I started with blue, then purple, then black, and finished with silver. Let each color dry 5+ minutes between coats if you’ve put a lot of color on; too much and it will drip and ruin your ‘galaxy’ look!

    Finishing the geode

    • Once your cake is colored, press rock candy crystals into the frosting to cover the base of the geode ‘hole.’ I found tweezers handy for reaching the deeper parts.
    • To color the geode, use a bit of airbrush color or dispense some cake spray into a small bowl and brush into the center/deepest part of the geode. Add the most color at the center and make it progressively lighter toward the outer edges. I added more silver with a brush along the outer edge.
    • Rim the outside of the geode with bits of edible silver leaf – I tried a few methods for transferring it, because it’s a bit fragile and finicky. Tearing off and moving bits at a time with a paintbrush has been my favorite method so far!
    • With your paintbrush and a bit of metallic silver paint or lustre dust, add a few ‘flicks’ of silver spray onto the cake. Finish it off with a few silver sprinkle constellations and some silver rock candy around the tier bases – and you’re done!
    • Seriously; find someone to give you a high-five on your kick-butt cake! 😉

    Video

    Notes

    Small paring knife (to make the geode cut in the side of the cake
    5 large straws or cake dowels
    OR you can use blue, purple, black, and silver edible cake sprays!

    Nutrition

    Serving: 1slice (1/24th cake) | Calories: 755kcal | Carbohydrates: 98g | Protein: 8g | Fat: 37g

    Did you make this Galaxy Geode Cake? 

    Let me know how it went – or make my day and find me on Pinterest or on Instagram and tag @IntensiveCakeUnit in your photo! 
    You can also leave a comment or recipe rating at the bottom of the page! 

    Related 
    Cream Cheese Buttercream Frosting

    Other recipes you may love…

    (Click / tap the photos to be taken to the recipe pages!)