
So you want to make a Tennis ball cake?
I've got you covered! 🙂
Whether you need a Tennis ball cake for a birthday party, competition, or just a fun event, this is a simple but really fun effective design!
(As an aside, I’ve also seen these made for dogs, lol. This isn’t a dog-friendly recipe, but if you have a dog-friendly cake recipe you want to use - I can help you get it decorated! 😉 )
As conceptually simple as they look, sports-themed cakes can be a touch tricky to pull off convincingly.
Backstory to this cake - I’ve been really surprised at the attention the Golf Ball cake recipe I posted has gotten. The other internet recipe 'hole' I noticed was the 3D tennis ball cake - I couldn’t find many recipes as I was researching the best way to go about making one. So I post this in hopes I can help someone! If that’s you, I’m glad you found this page and I hope it’s helpful to you!
Design snags I had to contend with -
Cake shape.
This was my first go at a full-sphere cake - and I was worried about stability. (Who wouldn’t be??) That said - a central dowel (coffee straw) really saved me here. Even though I noticed that the base cake layer took on some ‘smushing’ as I was stacking on the next 3 layers, the dowel gave me an easy way to keep the whole thing from tipping. And it sure tried to tip. ><
Now. It wasn’t enough smushing to be a big problem, but it’s worth noting - if you’re wanting a perfect sphere, you’ll need a more sturdy cake layer than the glorified-cake-mix-layers I’ve posted below. (A half-recipe of my favorite Vanilla Cake recipe should work, though my road test of that theory is still pending results.)
If you’re tempted to stack up regular layers and sculpt a sphere by hand, one quick word of warning. I once tried sculpting a half-sphere from 3 8” cake layers – and it went…less than well. Ha. The shape wasn’t what I’d wanted, and I wasted a ton of cake in the process. It was the ugliest igloo ever and I'm still bugged at how it turned out. I’m not saying you can’t do it, I’m just saying it might be harder than you think. (Do with that information what you will. I maintain the <$10 I spent on my half-sphere pan was worth it.)
So that said, I opted for the half-sphere pan - with one hesitation. I tend to dislike large cake pans because the edges often get dry before the center is baked through. Meh. Here’s the hint that saved me here - put a flower nail upside-down inside the pan base. This helps conduct heat into the center of the cake, helping it bake more easily so the edges don’t dry out so much.

(Also - don’t over-fill your pan(s); I overflowed one all over my oven once and it was a disaster. Leave a good ½ inch (centimeter or so) of space at the top of the pan so it doesn’t overflow as it rises in the oven. )
Frosting color.
My other worry was the frosting. Buttercream with some added cream cheese is my go-to frosting. It’s delicious, but it’s not the bright white that would match that white line in a tennis ball. This was my first go at buttercream with shortening added, and I added some frosting whitener that worked really well. (Only add the whitener to a bit of the frosting if you use it though; it keeps the other colors from deepening. Which will really bum your decorating flow.)
Decorating process.
In hindsight, I might chill my cake layers before stacking a spherical cake up next time. It might help with the ‘smushing’ I noticed in the base layer.
I’m normally ‘meh’ on dowels unless a cake needs to be transported in a car. BUT. I 100% recommend a dowel for this one. Unless you have a really good eye and light hand for balance as you decorate. I don’t, so having that dowel to press a finger down on and keep the cake steady was a godsend in the frosting process.
Also - just be aware if you use the tiny star tip to decorate like I did…you’ll probably have a bit of a sore hand + arm. It’s just a lot of piping. :/ Sorry I don’t have a fix for that. :/
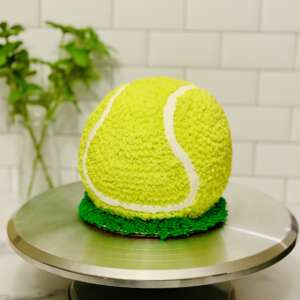
Result -
I was SO glad I did the tester, because I was happy with how the real thing came out! Picture above, and the video’s at the end of the recipe card -
If you’re looking to make a tennis ball cake, tips are above and the recipe’s below – happy baking! If you try out the recipe let me know what you think!
(Disclosure: As an Amazon associate I may earn from qualifying purchases, and my posts often contain affiliate links. If you click a link and make a purchase, I may receive a commission at no extra cost to you!)
Don't forget to pin this recipe for later!

Tennis Ball Cake
Equipment
- 6-inch half sphere cake pan (I just used 1; 2 would save some baking time)
- large flower nail (optional but highly recommended; helps the cake bake evenly)
- Cake dowel or straw (for stability; optional but recommended)
- Cake turntable (optional, but makes decorating much easier)
- 2x2 acetate sheet (100% optional, but I used it to smooth the frosting before piping)
- 3 piping bags
- small slotted tip (like the Ateco 44)
- Small star tip (like the Ateco 14)
- grass tip (like the Ateco 234)
Ingredients
Cake layers
- 1 box cake mix (Flavor's up to you; I used vanilla with 1/2 cup of added sourdough discard)
- ½ cup butter (melted and cooled)
- 4 eggs
- 1 cup buttermilk (room temperature, or use 1 cup milk mixed with with 2 tsp lemon juice)
- 1 teaspoon vanilla extract
Frosting
- 6 ounces cream cheese (softened)
- ¾ cup butter (1 ½ sticks; room temperature)
- 4-5 cups powdered sugar
- 1 Tablespoon clear vanilla extract
- 1-3 Tablespoons milk (if needed to reach a spreadable consistency)
- 2 Tablespoons frosting whitener (optional)
- 2-3 drops yellow gel food coloring
- 2-3 drops electric green gel food coloring
- 2-3 large drops green gel food coloring
Instructions
Cake layers
- Preheat oven to 350°F (177℃). Prepare a 6-inch half sphere pan with baker's floured cooking spray (or grease and flour pan well). Place flower nail in the base of cake pan.
- Combine melted butter, buttermilk, eggs, and vanilla in a large bowl and mix until combined. Add in cake mix and stir until moistened (about 30 seconds), then beat on medium speed for about 2 minutes.
- Pour half of the batter into prepared pan. (Place remaining batter into the fridge.) Batter level should be at least a half-inch below the cake pan rim. (Might not hurt to place a baking sheet in the oven under the pan just in case.)
- Bake for 35-45 minutes, (or until a toothpick inserted in the center comes out clean). Allow to cool for 10 minutes before removing cake from pan. Repeat with remaining cake batter.
- Chill before stacking/decorating. (Place in the fridge to accelerate the cooling process if desired.) While you’re waiting…make your frosting!
Frosting
- Beat together cream cheese and butter; beat in powdered sugar and vanilla until well combined. Add milk if needed until frosting reaches an easily spreadable consistency.
- Remove ⅓ cup of frosting into each of 2 bowls - add whitener to one for the white ‘line’ if you’d like. Color the other bowl green for the ‘grass’ border. Color remaining frosting ‘tennis ball’ yellow - I used 3 drops each yellow and electric green.
Assembly & Decorating
- (If desired, use a cake leveler or large serrated knife to slice cake into 2 layers to fill with frosting).
- Place a smear of frosting on a plate or cake circle (to keep the cake from sliding while you decorate it) and center the top of one half-shere in the center of the circle. Spread with frosting and repeat with the base of that half-sphere. Insert a straw or dowel in the center for stability (optional but recommended). Repeat in reverse with the other half-sphere (so it looks like a ball when you’re done. ;) )
- Add a crumb coat (thin layer of frosting) to the outside, and chill for 20-30 minutes in the fridge or 10-15 minutes in the freezer to set.
Decorating: the ‘line’
- Transfer white frosting to a piping bag fitted with a small slotted tip.
- All y’all more artistic than me could probably eyeball this part - but I tried free-hand piping this and it was messy, lol. So I grabbed a 2-foot piece of string and used it to create the ‘line’ I wanted - then pressed it into the frosting to make a guideline to follow as I piped (removing the string as I was piping). Whatever method you use, pipe a white line of frosting to the outside of the cake to resemble a tennis ball. Mine was about 3 inches apart at the top expanding to roughly 6 inches at the widest part near the cake base.
Decorating: the rest of the tennis ball
- (This will be the most time-consuming step-) transfer the yellow-green frosting to a piping bag and pipe small stars covering the rest of the cake. My hand got tired during this step; rotate positions and take breaks if you need to. :) You can probably see in the video - I even laid sideways on the table to pipe near the base of the cake. Go with what works. ;)
- Once the cake is covered, set it in the fridge for 20-30 minutes to semi-set the frosting. Then I took a paper towel and gently pressed into the ‘pointy’ parts of the frosting to mute the points a bit - this was the closest I could get to resembling the textured look of a tennis ball.
- Transfer green frosting to a piping bag fitted with a grass tip, and pipe a rim of grass around the cake base. High-five yourself on your awesome cake - and enjoy!
Video
Notes
Nutrition
Did you make this Tennis ball cake?
If you loved the recipe, please help other people find it! Add a comment or a recipe rating at the bottom of the page! 🙂
Send me an email and let me know how it went – please let me know if you have any questions or had any issues! Emails go straight to my inbox and I'm happy to help 🙂
Or make my day and find me on Pinterest or on Instagram and tag @IntensiveCakeUnit in your photo!
Other recipes you may love...
(Click/tap the images to be taken to the recipe pages!)


