Tag: sprinkle drip cake

  • Sprinkle Drip Tutorial!

    Sprinkle Drip Tutorial!

    One of my FAVORITE EVER cake decorating techniques...

    One of my favorite cake decorating styles – especially lately – is the sprinkle drip! While it may appear tricky to do, adding sprinkles to a drip is actually stunningly simple with a few easy pointers – and all the pointers I can pass on to you are below! 

    A couple quick troubleshooting tips - 
    • The recipes below are all made in the microwave. Microwave powers vary widely per microwave - the directions specify half (50%) power for microwave times so that the drip mixture doesn't get over-heated.
      Over-heated chocolate or candy melts will often seize or harden, ruining your drip mixture. If you have a strong microwave you may want to start with a lower power or shorter time intervals! 

    • Colors can be added to any of the drips below if desired! Please note though -

      • Add colors *after* the drip mixture is fully melted and smooth 

      • Use gel food coloring - liquid food coloring will almost always cause your drip mixture to seize and harden! It's happened to me before and it's definitely frustrating. 

    FAQs

    What if I've never added a drip to a cake before?”
    • Don't stress- it's actually super easy! 

    • My biggest tips - make sure you measure your chocolate/candy melts and heavy cream accurately. Too much/little of either may affect your drip consistency. 

    • Make sure you try a test drip first! Don't pour the drip mixture over your whole cake until you're confident in the consistency of your ganache.
      You can adjust the consistency by warming or cooling slightly (warmer = thinner). If that’s not enough you can adjust more by adding 1 teaspoon of whipping cream (thinner) or 1 Tablespoon of chocolate chips (thicker) at a time, stirring until smooth.

    • This YouTube tutorial by Sugar&Sparrow covers drips in a good level of detail - it's a great watch! 

    What if my sprinkles aren't sticking?”
    • This is the worst; if it's happening to you I'm sorry! 

    • If your drips are setting too fast, you can try thinning the mixture a bit with 1/2-1 teaspoon of whipping cream at a time. You can also try adding just 2-3 drips at a time and adhering the sprinkles before they have too much time to set. 

    • I've only had trouble with drips setting too fast in the dead of winter when my kitchen was cold. You can run a space heater in your decorating space - I've definitely done this before! ;)

    • One other idea - I'll probably be the only one to give you this advice since it's a touch on the questionable side. :/ But I actually took a warm hair dryer to a particularly troublesome set of drips I didn't want to scrape off and re-do. Something to try if you're desperate and short on time! Just be careful you don't accidentally over-do it and melt any of your frosting! 

    (Disclosure: As an Amazon associate I may earn from qualifying purchases, and my posts often contain affiliate links. If you click a link and make a purchase, I may receive a commission at no extra cost to you!) 

    Don't forget to pin for later!

    Sprinkle Drip Cake Tutorial
    Sprinkle Drip Cake Tutorial

    Also – my sweatshirt is available here! 😉

    Sprinkle Drip Tutorial

    Several of my most popular cakes feature a sprinkle drip, and videos don't give much detail - here's a more in-depth Sprinkle Drip tutorial!
    Prep Time15 minutes
    Cook Time0 minutes
    Decorating time30 minutes
    Total Time45 minutes
    Course: Dessert
    Cuisine: American
    Keyword: How to add sprinkles to cake drips, Make a Sprinkle Drip Cake, Sprinkle Drip Cake, Sprinkle Drip Cake how to, Sprinkle Drip Cake Tutorial, Sprinkle drip Tutorial
    Servings: 16 (varies)
    Calories: 782kcal
    Author: Sarah H

    Equipment

    • small offset spatula (optional; I usually cover the cake top as well when I add a drip, so I use an offset spatula to smooth it)
    • Squeeze bottle (or piping bag - or you can use a spoon; you'll just have a bit less control)
    • large piping bag + tip (optional; I used one for the cake in the video)

    Ingredients

    To make a Sprinkle Drip cake -

    • 1 frosted and chilled cake flavor/size/color of your choice – see my favorite recipes here!
    • Chocolate, white chocolate, or candy melt drip mixtures (see below)
    • 4-5 Tablespoons Sprinkle mix of your choice
    • Whatever other decorations you’d like to add to your cake! (I often use more sprinkles, frosting swirls, edible glitter, small cookies, or cherries)
    • Large piping bag & tip – I use this set of reusable large bags & tips more than almost any of my others!

    Chocolate Ganache drip (option 1)

    White Chocolate Ganache drip (option 2)

    Candy Melt drip (option 3)

    • 4 ounces white or colored candy melts (I usually use Wilton brands)
    • 2 ½ Tablespoons heavy whipping cream (my favorite brand is incredibly thick; you may need a bit less depending on the thickness of your heavy cream)

    To add the Sprinkles to the drips

    • 4-5 tablespoons Sprinkle mix of your choice
    • 1 teaspoon (ish) Crisco or shortening

    Instructions

    Chocolate Ganache drip (option 1)

    • Place chocolate chips in a microwave-safe bowl. Add whipping cream and microwave on half power in 30-second intervals, stirring in between until fully melted and smooth.

    White chocolate ganache (option 2)

    • Place heavy cream and white chocolate chips in a microwave-safe bowl. Microwave on half power in 30-second intervals, stirring in between until fully melted and smooth. Stir in gel food coloring if using.

    Candy Melt Drip (option 3)

    • Place heavy cream and candy melts in a microwave-safe bowl, and microwave on 50% power in 30-second intervals until smooth, stirring in between.

    Okaaaay...adding the drip to the cake!

    • Allow drip mixture to cool to a moderate temperature – it should feel slightly warm and still be fairly liquid. Transfer mixture to a squeeze bottle or piping bag. (Or have a spoon handy! I just found spoons to be a little bit more difficult to work with when I new to cake drips.)
    • Slowly drizzle ganache around the upper edge of your cake, pausing every inch or so to let more ganache fall in a drip down the side of the cake. Cover the top of the cake with the drip mixture if desired, smoothing with an offset spatula.

    Adding sprinkles

    • To add the sprinkles to the drip, shake some of your sprinkles into a shallow bowl or dish. Spread a bit of shortening on your fingertip – this will make the sprinkles stick to your finger, and make it easy to transfer them to the drip!
    • Gently press sprinkles into the drips, adhering as many sprinkles as you’d like to each drip. (This is the reason I included 30 minutes under 'Decorating time;' this part can be a little time-consuming). Return cake to the fridge or freezer to set the drips once the sprinkles are on.
    • Decorate the rest of the cake as you like! Enjoy!

    Video

    Notes

    (Nutrition information is for a frosted / decorated 8-inch cake. Please note nutrition information is an estimate and may not be entirely accurate, and will vary with size / flavors / decorations chosen.) 

    Nutrition

    Serving: 1serving | Calories: 782kcal | Carbohydrates: 101g | Protein: 9g | Fat: 38g

    Did you use this Sprinkle Drip Tutorial to make a sprinkle drip cake? 

    Send me an email and let me know how it went – or make my day and find me on Pinterest or on Instagram and tag @IntensiveCakeUnit in your photo!

    You can also add a comment or a recipe rating at the bottom of the page! 🙂

    Other recipes you may love…

    (Click / tap the photos to be taken to the recipe pages!)

  • Halloween Sprinkle Spill Cake

    Halloween Sprinkle Spill Cake

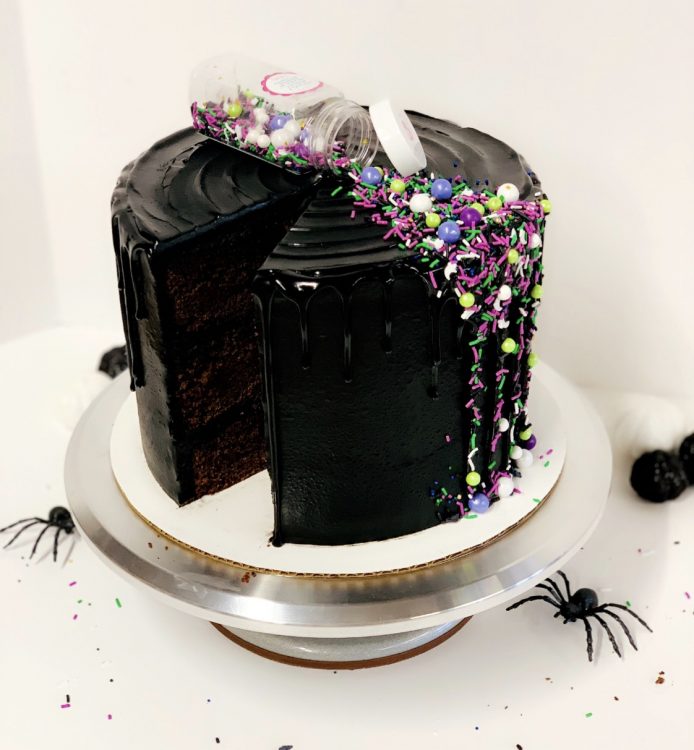
    Short story time.
    Featuring a clumsy baker.

    Story behind this Halloween Sprinkle Spill cake. I was working on a cake for an Instagram collab project - with an open bottle of sprinkles on the counter. In hindsight, I should've known better. But I digress. 

    I was part-way through the decorating process working on said cake...when I caught the bottle of sprinkles with my elbow. The bottle tipped over and half the sprinkles went sprawling across the counter! UGH. 

    But I was able to salvage enough to finish the cake. Small wins. And the scattering of sprinkles strewn across my counter actually looked kinda cool – and there was my next cake idea!  

    One of the easier Halloween cakes I’ve done, and, and I LOVED the look of the sprinkles against the black frosting! Recipe and links to everything I used are below! 


    FAQs

    “Do I have to make the cake / frosting from scratch?”
    • Absolutely not if you don't want to! You can substitute 2 of your favorite cake mixes plus the ingredients the mix calls for; keep the baking pans the same! The cake layers will just be a little less rich. Substituting butter for oil, buttermilk for water, and adding an extra egg will help!

    • Store bought frosting is usually a little thinner than scratch recipes. I'd recommend adding 1/4 cup of black cocoa powder at a time until you reach a consistency that spreads and stays in place on the cake well. Add black gel color and mix until combined. 

    “What if I've never added a drip to a cake before?”
    • Don't stress! It's easier than you probably think it is! 🙂 

    • My biggest tips - make sure you measure your chocolate and heavy cream accurately. Too much/little of either may affect your drip consistency. 

    • Make sure you try a test drip first! Don't pour the ganache over your whole cake until you're confident in the consistency of your ganache. You can adjust the consistency by warming or cooling slightly (warmer = thinner). If that’s not enough you can adjust more by adding 1 teaspoon of whipping cream (thinner) or 1 Tablespoon of chocolate chips (thicker) at a time, stirring until smooth.

    • I loved this YouTube tutorial by Sugar&Sparrow when I was new to cake drips! 

    (Disclosure: As an Amazon associate I may earn from qualifying purchases, and my posts often contain affiliate links. If you click a link and make a purchase, I may receive a commission at no extra cost to you!)

    Halloween Sprinkle Spill Cake

    Even clumsy bakers can make beautiful things! 😉 This Halloween Sprinkle Spill cake is a fun way to show off your favorite sprinkle mixes!
    Prep Time30 minutes
    Cook Time35 minutes
    Decorating time1 hour
    Total Time2 hours 5 minutes
    Course: Dessert
    Cuisine: American
    Keyword: Halloween Cake, Halloween cake recipe, Halloween Sprinkle Cake
    Servings: 16 servings
    Calories: 778kcal

    Ingredients

    Cake layers

    • 2 ¼ cups all purpose flour (350g)
    • 2 ¼ cups granulated sugar (450g)
    • 1 ¼ cup cocoa powder (100g)
    • 1 teaspoon baking soda
    • ¾ teaspoon salt
    • 1 cup unsalted butter (2 sticks/250g; softened)
    • 4 large eggs (at room temperature)
    • 1 ½ cups buttermilk (350mL)
    • 2 teaspoons vanilla extract

    Black Cocoa frosting

    Black Chocolate Ganache drip

    Decorations

    • 1 sprinkle mix/bottle of your choice! (I used the 4-oz ‘Witchful Thinking’ from Sweetapolita; you could use whatever seasonal mix you’d like!)
    • 1-2 teaspoons Crisco / vegetable shortening

    Instructions

    Cake layers

    • Preheat an oven to 350℉ (180℃). Grease 3 8-inch cake pans with baker's floured spray and/or line pans with parchment rounds.
    • Mix together dry ingredients (flour, sugar, cocoa powder, baking soda, and salt) in the bowl of a stand mixer with a paddle (or hand mixer or whisk) until well combined. Add in bits of softened butter, mixing until no lumps of butter are visible and the mixture looks crumbly.
    • Whisk together eggs, buttermilk, and vanilla. Add to dry ingredients and mix until no dry ingredients are visible. Scrape down the bowl and beat for another 20 seconds.
    • Fill the three pans evenly - I find a kitchen scale helpful for this part, and each of mine weighed out to about 550g. Bake for 30-35 min or until a toothpick inserted comes out clean. Allow cake layers to cool for 10-15 minutes on a wire cooling rack before removing from pans, and cool completely before frosting. Set in the fridge or freezer to accelerate the cooling process if desired.

    Black Cocoa frosting

    • Beat together softened cream cheese and butter; slowly add in powdered sugar alternating with cocoa powder and milk until frosting reaches a spreadable consistency. Add vanilla, food color, and salt if needed and beat until well combined.

    Assembly

    • Once your cakes are cool, level them (if needed/desired). This can be done with a cake leveler or a large serrated knife and a ruler.
    • Place a smear of frosting on your cake circle (to keep the cake from sliding while you decorate it) and center your first cake layer in the center of the circle. Spread the layer with frosting. (I added a few sprinkles in between the cake layers, but this is optional; they didn't show as much as I'd have liked when the cake was cut.)
    • Add your next cake layer on top, and repeat the process with your remaining cake layers.
    • Now you're ready to crumb-coat . If you're unfamiliar with crumb-coating, it's just what it sounds like – spreading a thin layer of frosting over the entire outside of the cake to keep crumbs out of your final layer.
    • Once your crumb coat has set (this takes about 5-10 minutes in the fridge), add your final layer of frosting and smooth. I like to use an offset spatula and bench scraper for this part. Once your cake is covered, place it into the fridge (so the ganache drips set more quickly).

    Black Chocolate Ganache drip

    • Place chocolate chips in a heat-proof bowl. Add whipping cream and microwave on half power in 30-second intervals, stirring in between until fully melted and smooth. Add gel food color and stir until fully combined.
    • Allow to cool to a moderate temperature - it should still be liquid but feel only slightly warm - and transfer to a squeeze bottle or piping bag. (A spoon will work; you'll just have a bit less control over the drips.)
    • Slowly drizzle ganache around the upper edge of your cake, pausing every inch or so to let more ganache fall in a drip down the side of the cake. Return cake to the fridge or freezer to set the drips.
    • Cover the top of the cake with ganache – I textured mine a bit with a small offset spatula before it was set. Return cake to the fridge or freezer to set the drips.

    Now the fun part - decorating!

    • Coat a finger or two with a bit of shortening, and add sprinkles to about 3-4” of your drips down the side of the cake. (The shortening helps the sprinkles stick to your finger well enough to transfer to the cake, but will come off once you touch the drip!) Sprinkle more in a v-shaped pattern away from the drips, and set your open bottle of sprinkles at the base of the ‘V’!
    • And you’re done! Cut in and enjoy!

    Video

    Nutrition

    Serving: 1serving | Calories: 778kcal | Carbohydrates: 100g | Protein: 9g | Fat: 38g

    Did you make this Halloween Sprinkle Spill Cake?

    Send me an email and let me know how it went – or make my day and find me on Pinterest or on Instagram and tag @IntensiveCakeUnit in your photo!

    You can also add a comment or a recipe rating at the bottom of the page! 🙂

    Other recipes you may love…

    (Click / tap the photos to be taken to the recipe pages!)

  • Bourbon Black Forest Cake

    Bourbon Black Forest Cake

    Bourbon Black Forest Cake (topped with cherries, slice cut out)
    Bourbon Black Forest Cake

    Best way to dress up a Black Forest cake?

    Story short - all you need to do is add some bourbon! It was a STUNNING addition to the already-amazing chocolate + cherry combo. All my taste testers loved it and I can highly recommend it to you.

    Also...if you've never seen glitter cherries - I recommend checking out SheriWilson's Instagram! 😉 

    I'd been wanting to make a black forest cake and dress it up with bourbon and glitter cherries. Some AMAZING Pacific Northwest cherries at my local grocery store were alllll the excuse I needed! 

    I bought the glitter and the sprinkles from Heaven’s Sweetness Shop. They worked great - though I did realize later I could’ve gotten a better price with my Amazon Prime membership for the gold glitter. (I'll include the link below!) 

    Wanting to do a slightly-dressed-up Black Forest Cake, I tossed in some bourbon when I made the cake layers and the cherry filling, and also added a bit to the frosting. It’s not overwhelming but a great flavor addition to an already amazing flavor combo! Recipe below! 


    FAQS: 

    What do I need to make a Bourbon Black Forest Cake?  
    • You'll need classic cake ingredients - flour, sugar, baking powder, salt, butter, vanilla, eggs, vegetable oil - and two of my all-time favorite cake ingredients; bourbon and buttermilk

    • Cherry Bourbon filling is made with chopped fresh or frozen cherries - if you use frozen cherries modify the water content a bit; I've detailed instructions below!

    • the Vanilla Bourbon frosting I covered this cake in is made with cream cheese, butter, powdered sugar, bourbon, and vanilla - and it is *incredible!* 

    "Good grief. SO many steps! Any way to simplify the recipe a bit?" 
    • I mean obviously, I'd recommend the recipe - nothing beats scratch cake layers, filling, and frosting for taste!

    • That said - I get it, sometimes hands-on-kitchen-time is limited. And sometimes so is brain space, lol. You can substitute 2 of your favorite chocolate cake mixes plus the ingredients the mix calls for - substitute 1/4 cup bourbon for 1/4 of the water/milk and add 1/2 cup chopped cherries. Same baking pans. Your cake layers won't be quite as rich, but cake mixes are a definite time-saver! 

    • Store bought frosting is usually a little thinner than my recipe; add 2 Tablespoons of Bourbon and then a 1/4 cup of extra powdered sugar at a time. You're looking for a consistency that spreads and stays in place on the cake well. 

    What if I've never added a drip to a cake before?
    • Don't stress - this is a 2-ingredient drip! It's one of the easiest ones that you can start with.
    • First + best tip I can briefly pass on - make sure you measure your chocolate and heavy cream carefully and accurately. Too much/little of either may affect your drip consistency. Too thick, and it won't drip. Too thin, and it'll be runny and look weird. 
    • Second - I always recommend a test drip first! Lol and I always put my test drip at any spots I've had trouble smoothing the cake frosting, and that becomes the back of the cake. 😉 If your test drip is too thin, cool your ganache or thicken with a few more Tablespoons of chocolate chips. Too thick, and you can try warming it a bit or thinning it with some more whipping cream. 
    • I also recommend this YouTube tutorial by Sugar&Sparrow - it was one I watched when I was new to cake drips! 

    Have a question about this recipe? Send me an email

    (Disclosure: As an Amazon associate I may earn from qualifying purchases, and my posts often contain affiliate links. If you click a link and make a purchase, I may receive a commission at no extra cost to you!) 

    Don't forget to pin this recipe for later! 

    Bourbon Black Forest Cake pinterest pin

    Bourbon Black Forest Cake

    This Bourbon Black Forest Cake features rich chocolate cake layers, bourbon cherry filling, and a chocolate ganache drip!
    Prep Time20 minutes
    Cook Time35 minutes
    Decorating time35 minutes
    Total Time1 hour 30 minutes
    Course: Dessert
    Cuisine: American
    Keyword: Black Forest Cake, Bourbon Black Forest Cake, Chocolate Ganache drip
    Servings: 16 servings
    Calories: 770kcal
    Author: Sarah H

    Equipment

    Ingredients

    Bourbon Black Forest Cake layers

    • 2 ¼ cups all purpose flour (350g)
    • 2 ¼ cups granulated sugar (450g)
    • 1 ¼ cup cocoa powder (100g)
    • 1 teaspoon baking soda (5g)
    • ¾ tsp salt (4g)
    • 1 cup unsalted butter (2 sticks or 250g, softened)
    • 4 large eggs (at room temperature)
    • 1 ½ cups 350mL buttermilk (350mL)
    • 2 teaspoons vanilla extract (10mL)
    • ¼ cup bourbon (60mL; I used Eagle Rare bourbon)
    • ½ cup chopped cherries (I used fresh, but canned or frozen would work as well)

    Cherry Bourbon filling

    • 1 ½ cups 200g fresh cherries, chopped (200g; if you use frozen cherries omit 1 ½ Tablespoons of water from the cherry mixture)
    • ¼ cup 50g granulated sugar (50g)
    • 2 Tablespoons Bourbon (30g)
    • 1 Tablespoon cornstarch (7.5g)
    • 3 Tablespoons water (45 g, divided)

    Vanilla Bourbon Frosting

    • 8 ounces cream cheese (one package; softened)
    • 1 cup butter (16 tablespoons/two sticks, softened)
    • 6 cups powdered sugar (690g)
    • 3-4 Tablespoons bourbon (45-60g)
    • 1 Tablespoon clear vanilla extract (15g)
    • 1/4 teaspoon salt (if using unsalted butter)

    Drip & Decorations

    • 1 cup semisweet chocolate chips (6 ounces)
    • 3/4 cup heavy whipping cream (6 ounces)
    • 4-5 tablespoons sprinkle mix of your choice (Optional; I used Sweetapolita’s ‘Bubbly’)
    • 1 teaspoon (ish) Crisco / shortening (optional)
    • 7-8 cherries (I used fresh cherries, but maraschino cherries would work also)
    • 1-2 teaspoons gold edible glitter

    Instructions

    Bourbon Black Forest Cake layers

    • Preheat an oven to 350 degrees F (180C) or 325 FC (160C) for a convection oven. Prepare three 8 inch round pans with baker's floured spray (or grease and line with parchment rounds).
    • In the bowl of a stand mixer with the paddle attachment, add the flour, sugar, cocoa powder, baking soda, and salt. Mix until combined. Add in the softened butter a tablespoon at a time until it’s well combined into the dry ingredients and the mixture looks crumbly.
    • In a separate bowl, beat eggs, buttermilk, vanilla, and bourbon together until well combined. Add wet ingredients to dry ingredients and mix until no dry ingredients are visible. Scrape down the bowl, stir in chopped cherries, and beat for another 20 seconds.
    • Fill the three pans evenly - I find a kitchen scale helpful for this part, and each of mine weighed out to about 550g. Bake for 30-35 min or until a toothpick inserted comes out clean. Allow cake layers to cool for 10-15 minutes on a wire cooling rack before removing from pans, and cool completely before frosting. Set in the fridge or freezer to accelerate the cooling process if desired.

    Cherry Bourbon filling

    • Wash and chop your cherries, making sure to remove all of the seeds. This part can be time-consuming with a knife, but there are several handheld and countertop cherry pitters available online to make it faster!
    • Combine cherries, sugar, bourbon, and half of your water (1 ½ Tablespoons) in a saucepan and stir to combine. Continue stirring and heat on medium-low until sugar is dissolved.
    • In another small bowl, mix cornstarch with the remaining 1 ½ Tablespoon of water and stir until well mixed. Add the cornstarch mixture to the cherry mixture.
    • Continue to cook on medium-low heat until the mixture begins to thicken and simmer – I wanted a thick cake filling, so I let it cook for about a minute after it came to a low simmer. Remove from heat and cool completely – it may still seem too thin for a cake filling at first, but will continue to thicken as it cools.

    Vanilla Bourbon Frosting

    • Beat together softened cream cheese and butter; slowly add in powdered sugar alternating with bourbon until frosting reaches a spreadable consistency. Add vanilla and salt if needed and beat until well combined.

    Assembly

    • Once your cakes are cool, level them (if needed/desired). This can be done with a cake leveler or a large serrated knife and a ruler. Place a smear of frosting on your cake circle (to keep the cake from sliding while you decorate it) and center your first cake layer in the center of the circle. Pipe a small ‘dam’ of frosting around the outer edge to hold your filling in, and spread a layer of cherry filling over the first cake layer. Center the next cake layer on top. Repeat the process with your remaining cake layers.
    • Now you're ready to crumb-coat . If you're unfamiliar with crumb-coating, it's just what it sounds like – spreading a thin layer of frosting over the entire outside of the cake to keep crumbs out of your final layer. I usually do this with my large offset spatula.
    • Once your crumb coat has set (this takes about 5-10 minutes in the fridge), add your final layer of frosting and smooth. I like to use an offset spatula and bench scraper for this part. Once your cake is covered, place it into the fridge or freezer to set the frosting.

    Chocolate Sprinkle drip:

    • Meanwhile, make your ganache. Place chocolate chips in a heat-proof bowl. Add whipping cream and microwave on half power in 30-second intervals, stirring in between until smooth.
    • When your ganache has cooled to a moderate temperature – it should feel slightly warm and still be fairly liquid – transfer it to a squeeze bottle or piping bag. A spoon will work if you don’t have either of those, I've just found spoons to be a little bit more difficult to work with.
    • Slowly drizzle ganache around the upper edge of your cake, pausing every inch or so to let more ganache fall in a drip down the side of the cake.
    • To add the sprinkles to the drip, shake some of your sprinkles into a shallow bowl or dish. Spread a bit of shortening on your fingertip – this will make the sprinkles stick to your finger, and make it easy to transfer them to the drip! Add as many sprinkles as you’d like, and return cake to the fridge or freezer to set the drips.

    Decorating

    • Transfer some frosting to your large piping bag fitted with the tip of your choice (from the set linked above, I used the large star tip). Pipe swirls around the top edge of the cake – I alternated larger swirls with smaller more oblong swirls.
    • With a small new/food-safe foam brush, add some edible glitter (available here on Amazon) to your cherries (if you’re using fresh cherries use a brush, if you’re using maraschino cherries it’s easier to just roll them in the glitter). Space the cherries evenly around the top of the cake – and step back and admire your work!

    Video

    Nutrition

    Serving: 1slice (1/16th cake) | Calories: 770kcal | Carbohydrates: 99g | Protein: 8g | Fat: 38g

    Did you make this Bourbon Black Forest Cake? 

    Let me know how it went – or make my day and find me on Pinterest or on Instagram and tag @IntensiveCakeUnit in your photo!

    You can also add a comment or a recipe rating at the bottom of the page! 🙂


    You may also love...

    (Click / tap the photos to be taken to the recipe pages!)