Tag: Mickey Mouse cake

  • Mickey Mouse Cake

    Mickey Mouse Cake

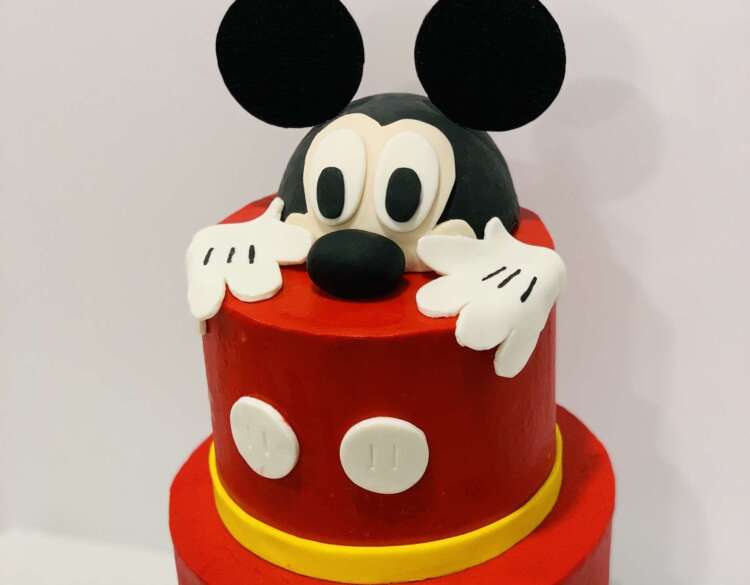
    If you need a Mickey Mouse cake that can feed a crowd…

    …then I’ve got a great cake for you! This Mickey Mouse cake feeds 24+ people generously, and the design is sure to be a crowd pleaser! 

    I LOVE it when I get creative reign on a themed birthday cake – this one is similar to a cake I saw somewhere in the archives on Pinterest. (I couldn’t find the original pin when I went to look for it. Please ping me for credit if you think it was yours!)

    Shooting for a design that would be cute but also easy to replicate, I went about creating my own version.

    “Design looks a little complicated…can I really make this cake myself?” 
    • Short answer – absolutely! More on why below. 😉 
    • First off – the topper is made with a fondant-covered styrofoam half-sphere. No cake sculpting! (Cause HOLY cow I hate sculpting cake.)
    • Let me tell you – as a decorator-fondant-disliker, I don’t work with fondant often. So if I can make it look decent-ish – anyone can! I had a few supplies to make some of the steps (like the feet) easier, and I’ve linked them below!
    • Quick FYI before you get too far into the recipe card further down the page! There are *very* detailed instructions below, so I know it looks like a short book. :/ Don’t let the length of the instructions intimidate you!
    • Honestly, most of the instructions can be summed up in the video. (I’d recommend giving it a quick watch; it’s less than a minute long. You can hit the ‘Jump to Video’ button at the top of the page.) 
    • If you’ve never stacked a tiered cake before, don’t sweat it! I promise it’s easier than you probably think it is. 😉 More on that below. 
    • Also – none of the decorations are any harder than anything you’ve already done in first grade arts and crafts. Honestly. If you can cut and glue, you can decorate this cake! 🙂 
    “Any tips if I’ve never stacked a tiered cake before?” 

    Happy baking – enjoy! Please feel free to email me with any questions; contact form emails go straight to my inbox! Recipes, instructions, and supply links are below!

    (Disclosure: As an Amazon associate I may earn from qualifying purchases, and my posts often contain affiliate links. If you click a link and make a purchase, I may receive a commission at no extra cost to you!) 

    (Don’t forget to pin for later!)

    Mickey Mouse Cake  pinterest pin

    Mickey Mouse Cake

    Always endlessly and wildly popular – here's how to make your own Mickey Mouse Cake for a crowd!
    Prep Time30 minutes
    Cook Time37 minutes
    Decorating time50 minutes
    Total Time1 hour 57 minutes
    Course: Dessert
    Cuisine: American
    Keyword: Mickey Mouse Cake, Mickey Mouse Birthday Cake
    Servings: 24 people
    Calories: 755kcal
    Author: Sarah H

    Equipment

    Ingredients

    Mickey Mouse Cake Layers

    • 4 7/8 cups all-purpose flour
    • 4 1/2 cups granulated sugar
    • 3 3/4 teaspoons baking powder
    • 1 ½ teaspoons salt
    • 1 ½ cup unsalted butter (or 3 sticks, room temperature)
    • 9 eggs
    • 2 ¼ cups buttermilk (room temperature)
    • 3 teaspoons clear vanilla extract
    • 3 Tablespoons vegetable oil

    Cream Cheese Buttercream Frosting

    • 12 ounces cream cheese (1 1/2 packages; softened)
    • 1 1/2 cups butter (24 Tablespoons or 3 sticks; softened)
    • 9 cups powdered sugar
    • 3 Tablespoons clear vanilla extract
    • 1/4 teaspoon salt (if using unsalted butter)
    • 4-6 Tablespoons heavy whipping cream
    • 4-5 large drops Red gel food coloring (Add now or save and add later if you’d rather fill/crumb-coat with white frosting. I used Americolor Super Red)

    Decorations

    • 6 ounces Black fondant (for base border / cake topper)
    • 4 ounces Yellow fondant (for ‘feet’ decorations and top tier border – this is optional, but I shaped Mickey’s feet with these popsicle molds!)
    • 2 ounces White fondant (for buttons and topper; there’s also a combo pack of white/black/yellow fondant available here!)
    • 1 small drop brown food coloring (to knead into white fondant for the topper)
    • 1 small drop Black gel food coloring (I used Americolor Super black)
    • 1-2 Tablespoons large sugar pearl sprinkles (I used red, black, and yellow)

    Instructions

    Cake layers

    • Preheat oven to 350°F. Prepare three 8-inch cake pans and three 6-inch cake pans with baker’s floured cooking spray, or grease and line with parchment rounds.
    • Mix together all dry ingredients (flour, sugar, baking powder, and salt) in a stand mixer with a paddle until fully combined. Mix bits of room-temperature butter slowly into the dry mix, on a low speed. Continue to mix until no large chunks of butter remain, and the mixture looks crumbly.
    • Pour in eggs and mix on low until just incorporated. Mix in the buttermilk in two parts on a low speed. Add in vanilla and oil, and mix on low until fully incorporated. Scrape down the sides of the bowl with a spatula, then beat on medium speed for about 30 seconds.
    • Divide batter between prepared cake pans (I used a kitchen scale for this part!) Pour about 300 grams into each of the 6-inch pans. Divide the rest of the batter into the remaining pans – I ended up with about 675g in my large pans. The kitchen scale guarantees your layers will bake to be the same height.
    • Bake for 35-37 minutes (or until a toothpick comes out clean). Allow cake layers to cool for 10-15 minutes on a wire cooling rack before removing from pans – it helps to run an offset spatula or knife around the perimeter of the pan first. Cool completely before frosting. Set in the fridge or freezer to accelerate the cooling process if desired.
    • Once the layers have fully cooled, they can be leveled and any caramelized bits can be trimmed from the sides / top of the cake using a serrated knife if desired. Be sure the layers are completely cooled or chilled before trimming. If you try to trim the layers while they’re still warm, they will crumble apart.
    • While you’re waiting…make your frosting and/or prep your decorations!

    Cream Cheese Buttercream Frosting

    • Beat together softened cream cheese and butter; slowly add in powdered sugar alternating with whipping cream until frosting reaches desired consistency. Add vanilla and salt and beat until well combined.
    • If you’d rather use less gel color, you can fill/crumb-coat your cake layers in white frosting and make just your outer layer red. If you’d rather use red frosting, add your gel color now!

    Mickey Mouse Topper

    • Cover your sphere in black fondant, using a bit of corn syrup to help it stick if needed. Cut an ‘M’ shape out of tan fondant and two ovals out of white / two smaller ovals out of black fondant (I recommend giving the video a quick watch for this part; it's less than a minute long!)
    • Roll a small black (slightly oblong) ball for the nose.
    • With a circle cutter or jar lid, cut 4 craft foam or paper circles (or 2 if you don't mind the toothpick showing on the back). Adhere a toothpick halfway onto each of 2 circles, and with the backing adherent (or tape), press 2 circles together to form ears. (Set aside; I added the ears once the sphere was on the cake.)
    • I free-handed the gloves on paper and traced them, but there are plenty of templates available online! I opted to paint the little lines on at the end so I didn’t smear them in the transfer.

    Assembly

    • Place a smear of frosting on your large cake circle (to keep the cake from sliding while you decorate it) and center your large first cake layer in the center of the circle.
    • Spread the layer with frosting, and add your next cake layer on top. Repeat the process with your remaining cake layers.
    • Next, repeat the same process with your smaller cardboard circle and cake layers. Of note – if your circles aren’t pre-center-punched, be sure to grab a dowel or straw and make your own hole in the exact center of the circle! This will allow you to center the tier on the base tier later on.
    • Now you're ready to crumb-coat. If you're unfamiliar with crumb-coating, it's just what it sounds like – spreading a thin layer of frosting over the entire outside of the cake to keep crumbs out of your final layer.
    • Once your crumb coats have set (this takes about 5-10 minutes in the fridge), add your final layers of frosting and smooth. I like to use an offset spatula and bench scraper for this part. For my larger tier, I was able to smooth the frosting fairly well free-handed, but I struggled getting the sides smooth on my smaller one. Trimming my smaller cake layers slightly smaller than my cake circle and using the cardboard as a guide worked well!
    • Place both tiers into the fridge to set the frosting – this makes stacking easier!

    Okaaaay. The stacking process!

    • I watched a few tutorials before I made my first tiered cake, and ‘How to Make a Tiered Cake’ by Chelsweets was my favorite. Basically, doweling a tiered cake is done to ensure that the top tier doesn’t crush the lower tier, as well as keeping it centered.
    • I used four shorter cut-to-height plastic straws for my base tier dowels, and one taller one cut at an angle in the center to hold my top tier in place.
    • Grab your ruler for this next part! To center a 6-inch cake on top of an 8-inch cake, place dowels into the base tier just over one inch from the cake edge, placing them evenly at quarter intervals around the cake.
    • Place your last, tallest straw or dowel into the exact center of the cake, making sure to keep it straight up as you press down. Now center the hole in the bottom of your top tier cake circle over the tallest dowel and let the top tier gently down onto the base tier. The dowel will poke into the center of the top tier to hold it in place.
    • Pat yourself on the back; you did it! I used a fondant border (cut with my ruler) to hide the tiny bit of cake circle that showed at the base.

    Decorating

    • Cut two small white circles, and press small ‘buttonholes’ into the circles with a butter knife, and press them onto the side of the top tier.
    • Roll out your red, yellow, and black fondant with a rolling pin and a bit of cornstarch if needed (to about 1/8" thick).
    • Cut a ½” yellow fondant strip (I used a ruler as a guide) and a ½” black fondant strip and wrap the yellow around the top and black around the base tier – this may be easier to do in 2 strips than 1 super-long one.
    • Add black, red, and yellow sugar pearls around the bottom tier of the cake – (alternatively, you could use these to replace the fondant strips around the tier bases!)
    • Place your cake topper on top of the cake, and add three small lines to each of Mickey’s hands –
    • Annnd you’re done! Congratulations!!

    Video

    Notes

    Please note nutrition information is an estimate and may not be exactly accurate. Also please note nutrition information also does not include fondant decorations (because decorator fondant really doesn’t taste good)! 

    Nutrition

    Serving: 1slice (1/16th base or 1/8th top) | Calories: 755kcal | Carbohydrates: 98g | Protein: 8g | Fat: 37g

    Did you make this Mickey Mouse Cake?

    Let me know how it went – or find me on Pinterest or on Instagram and tag @IntensiveCakeUnit in your photo! 


    Other cake ideas you may love… 

    (Click / tap the images to be taken to the recipe pages!) 

  • Mickey Mouse Birthday Cake

    Mickey Mouse Birthday Cake

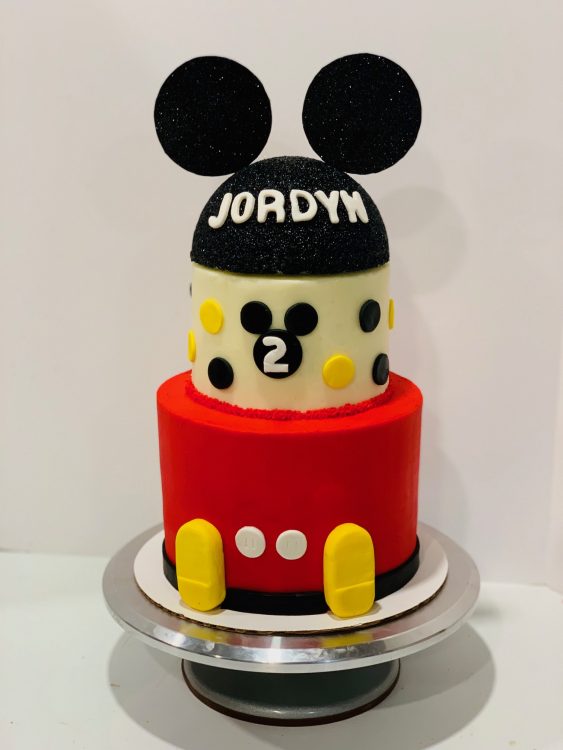
    Every once in a while I get a ‘vague’ cake brief…

    …and I LOVE it! I’ll sometimes get a request for a cake with nothing more than a size and a theme – and that means I get creative reign! 😉 

    Anyway, that’s what happened with this cake. I’d seen a Mickey Mouse birthday cake somewhere in the archives on Pinterest (please ping me for credit if you think the pin was yours!) and went about creating my own. Honestly, it came together more quickly and easily than I thought it would!   

    “How hard is this cake to make?”

    Short answer – not very! There are just always a few extra steps in making a tiered cake. If you’ve not made a tiered cake before – if you can build a block tower you can stack a cake. I promise it’s easier than you probably think! 🙂 

    None of the decorations are any harder than anything you’ve already done in first grade arts and crafts, either. 😉 

    I’d recommend giving the video a quick watch if you’re new to tiered cakes. (You can use the ‘Jump to Video’ button above, and the video’s less than a minute long!) I also really appreciated ‘How to Make a Tiered Cake’ by ChelSweets when I made my first successful tiered cake. 

    Trying to make sure I outlined the process well, I wrote pretty detailed instructions below. I know at first glance it looks like an insanely long recipe. Don’t let the instructions intimidate you! Really – the bulk of what I wrote can be  summed up in the video. 

    Recipes, instructions, and links to everything I could find to link to are below! Feel free to email me with any questions, and enjoy!

    (Disclosure: As an Amazon associate I may earn from qualifying purchases, and my posts often contain affiliate links. If you click a link and make a purchase, I may receive a commission at no extra cost to you!)

    Cake Flavor Modifications:

    Oreo + Confetti – Follow the recipe as written below. After beating the vanilla extract into the batter, stir in 1/2 cup of rainbow jimmies sprinkles (not nonpareils as the color may dissolve) and 12-15 crushed Oreos.
    (I once received a request for a Mickey Mouse cake with an Oreo base tier and a confetti top tier. Convenience enthusiast that I am – I found a way to make both batters at the same time, dirtying as few dishes as possible! I measured the vanilla batter directly into the smaller pans and mixed in the rainbow jimmies sprinkles. Then I added crushed Oreos to the remaining batter before dividing it for the base tier layers.) 

    Add 1/2 cup of crushed Oreos and 1/4 cup of rainbow jimmies to 1 1/2 cups of frosting for cake filling if desired! 

    Cake decoration modifications:

    Please see below the recipe card (click the ‘Jump to Video’ button and scroll down) to see decoration modifications for the cake pictured below! 


    Mickey Mouse Birthday Cake
    Mickey Mouse Birthday Cake

    Don’t forget to pin for later! 

    Mickey Mouse Birthday Cake pinterest pin

    Mickey Mouse Birthday Cake

    One of my most-requested birthday cake designs – here's how I made a fun Mickey Mouse Birthday Cake! Makes enough to serve a large crowd!
    Prep Time30 minutes
    Cook Time37 minutes
    Decorating time1 hour
    Total Time2 hours 7 minutes
    Course: Dessert
    Cuisine: American
    Keyword: Mickey Mouse Birthday Cake, Mickey Mouse Cake
    Servings: 24 servings
    Calories: 755kcal

    Equipment

    Ingredients

    Vanilla Cake Layers (see above for Oreo Confetti modification)

    • 4 ⅞ cups all-purpose flour
    • 4 ½ cups granulated sugar
    • 3 ¾ teaspoons baking powder
    • 1 ½ teaspoon salt
    • 1 ½ cup unsalted butter (or 3 sticks, room temperature)
    • 9 eggs
    • 2 ¼ cups buttermilk (room temperature)
    • 1 ½ Tablespoons clear vanilla extract

    Cream Cheese Buttercream Frosting

    • 12 ounces cream cheese (1 ½ packages; softened)
    • 1 ½ cups butter (3 sticks; softened)
    • 9 cups powdered sugar
    • 3 Tablespoons clear vanilla extract
    • ¼ teaspoon salt (if using unsalted butter)
    • 4-6 Tablespoons heavy whipping cream
    • 4-5 large drops Red gel food color (save and add later)

    Decorations & Mickey Mouse topper

    • 4 ounces Black fondant (for circles and cake base)
    • 4 ounces Yellow fondant ( for circles / Mickey feet)
    • 2 ounces White fondant (for buttons – you only need a little bit of this, so you could cut slices from a marshmallow for the buttons if you wanted to leave off the number and lettering!)
    • Black edible color spray (to color foam half-sphere)

    Instructions

    Vanilla Cake Layers

    • Preheat oven to 350°F. Prepare three 8 inch round pans and two 6 inch pans with baker’s floured spray (or grease and line with parchment rounds).
    • Mix together all dry ingredients (flour, sugar, baking powder, and salt) in a stand mixer with a paddle until fully combined. Mix chunks of room-temperature butter slowly into the dry mix, on a low speed. Continue to mix until no large chunks of butter remain, and the mixture becomes crumbly.
    • Pour in eggs and mix on low until just incorporated. Mix in the buttermilk in two installments, on a low speed. Add in vanilla, and mix at a low speed until fully incorporated. Scrape down the sides of the bowl with a spatula, then beat on medium speed for about 30 seconds.
    • Divide batter evenly between the prepared cake pans (I used a kitchen scale for this part – I had about 675g in my large pans and 450 in my smaller ones.) The kitchen scale guarantees your layers will bake to be the same height.
    • Bake for 34-37 minutes, (or until a skewer comes out clean). Allow cake layers to cool for 10-15 minutes on a wire cooling rack before removing from pans. Cool completely before frosting. Set in the fridge or freezer to accelerate the cooling process if desired.
    • Once the layers have fully cooled, the caramelized bits can be trimmed from the sides / top of the cake using a serrated knife if desired. Be sure the layers are completely cooled or chilled before trimming. If you try to trim the layers while they’re still warm, they will crumble apart. (This is a great time to make your frosting!)

    Cream Cheese Buttercream Frosting

    • Beat together softened cream cheese and butter; slowly add in powdered sugar alternating with whipping cream until frosting reaches desired consistency. Add vanilla and salt and beat until well combined.
    • Remove 2 cups and add red gel color – you can always color a bit more if you need it later!

    Assembly

    • Once your cakes are cool, level them (if needed). Place a smear of frosting on your large cake circle (to keep the cake from sliding while you decorate it) and center your large first cake layer in the center of the circle.
    • Spread the layer with (white) frosting, and add the next layer on top. Repeat the process with your remaining cake layers.
    • Next, repeat the same process with your smaller cardboard circle and cake layers. Of note – if your circles aren’t pre-center-punched, be sure to grab a dowel or straw and make your own hole in the exact center of the circle! This will allow you to center the tier on the base tier later on.
    • Now you're ready to crumb-coat . If you're unfamiliar with crumb-coating, it's just what it sounds like – spreading a thin layer of frosting over the entire outside of the cake tiers to keep crumbs out of your final layers.
    • Once your crumb coats have set (this takes about 5-10 minutes in the fridge), add your final layers of frosting and smooth (red for the base tier, white for the top). I like to use an offset spatula and bench scraper for this part. For my larger tier, I was able to smooth the frosting fairly well free-handed, but I struggled getting the sides smooth on my smaller one. Trimming my smaller cake layers slightly smaller than my cake circle and using the cardboard as a guide worked well!
    • Place both tiers into the fridge to set the frosting – I think this makes stacking easier.

    Okaaaay. The stacking process!

    • (I watched a few tutorials before I made my first tiered cake, and ‘How to Make a Tiered Cake’ by Chelsweets was my favorite!) Basically, doweling a tiered cake is done to ensure that the top tier doesn’t crush the lower tier, as well as keeping it centered. I used four shorter cut-to-height plastic straws for my base tier dowels, and one taller one cut at an angle in the center to hold my top tier in place.
    • Grab your ruler for this next part! Push shorter straws into the base tier just over one inch from the cake edge, placing them evenly at quarter intervals around the cake. Place your last, tallest straw or dowel into the exact center of the cake, making sure to keep it straight up as you press down. Now you’re ready – center the hole in the bottom of your top tier cake circle over the tallest dowel and let the top tier gently down onto the base tier. The dowel will poke into the center of the top tier to hold it in place.
    • Pat yourself on the back; you did it! I found that my cardboard cake circle showed more than I was happy with, so I piped some extra frosting onto the base of the top tier to hide it.

    Mickey Mouse topper

    • Cover the craft foam half-sphere in black spray color.
    • With frosting and a piping bag (or fondant and number / letter cutters), pipe any desired decorations onto the topper – I used the birthday girl's name!
    • With a circle cutter or jar lid, cut 4 identical craft foam circles. Place a toothpick halfway onto each of 2 circles, and with the backing adherent (or glue if using regular craft foam), press 2 circles together form each of Mickeys ears. I added the ears once the sphere was on the cake – you can add them whenever!

    Now the fun part – decorating the cake!

    • Whether using fondant or marshmallows, press small ‘buttonholes’ into the circles with a butter knife, and press them onto the side of the base tier.
    • Form Mickey feet from yellow fondant. (I found it easiest to shape the fondant with an ice cream bar mold, and set the fondant in the freezer so it wouldn’t deform in the de-molding process.) With a small knife, cut a thin slice horizontally down the top 2/3 of the ‘shoes’ to make the 'heels.' Press the shoes into the sides of the cake, to either side of the buttons.
    • Roll out your black and remaining yellow fondant with a rolling pin and a bit of cornstarch if needed – cut several black and yellow circles to decorate the top tier. Roll out a long black strip – I measured 12” long ½” wide strips with a ruler – and used 2 of them to go around the base of the cake, cutting them to fit around the shoes.
    • Add your black and yellow dots and letters/numbers if desired – and you’re done!

    Video

    Notes

    (Please note nutrition information is an estimate and may not be exactly accurate.) 

    Nutrition

    Serving: 1serving | Calories: 755kcal | Carbohydrates: 98g | Protein: 8g | Fat: 37g

    Decoration modifications 

    Supplies 

    Mickey Mouse Topper

    Additional Decorating supplies

    • 2 ounces Black fondant (for circles for Mickey heads on the cake base)
    • 4 ounces Yellow fondant (for decorations and band around top tier)
    • 1 ounce White fondant (for buttons) – you only need a little bit of this, so you could cut slices from a marshmallow for the buttons if you wanted to.
    • 1/4 cup Large redblack, and yellow sugar pearl sprinkles 
    Instructions 
    1. Follow cake + frosting instructions above in the recipe card – but only color about 1 cup of frosting red to decorate the top cake tier.
    2. Follow instructions above to stack cake tiers.
    3. With a circle cutter or jar lid, cut 4 identical craft foam circles. Place a toothpick halfway onto each of 2 circles, and with the backing adherent (or glue if using paper or regular craft foam), press 2 circles together form each of Mickeys ears. I added the ears once the sphere was on the cake – you can add them whenever!
    4. Roll out fondant (all colors) to about 1/8″ with a rolling pin and a bit of cornstarch if needed.
    5. Cut a large yellow fondant strip (I used a ruler as a guide), and variety of smaller and larger red, yellow, and black fondant circles. Cut the centers out of some of the red and yellow circles. I used two sizes of black to make Mickey ears, and some filled and some hollow red and yellow circles. Press them into the frosting around your base tier!
    6. Whether using fondant or marshmallows, press small ‘buttonholes’ into the circles with a butter knife, and press them onto the side of the top tier.
    7. Add black, red, and yellow sugar pearls around the base of the cake – you can also add a few to the side of the cake if you’d like!
    8. Place your cake topper on top of the cake, and add any numbers / names / stars to decorate that you’d like!

    Annnd you’re done! Congratulations!


    Did you make this Mickey Mouse Birthday Cake?

    Send me an email and let me know how it went – or make my day and find me on Pinterest or on Instagram and tag @IntensiveCakeUnit in your photo!

    You can also add a comment or a recipe rating at the bottom of the page! 🙂

    Other recipes you may love…

    (Click / tap the photos to be taken to the recipe pages!)