Strap in - we’re making a no-bake Espresso Martini cheesecake that's packed with cocktail flavor!
Since my Coconut Rum cheesecake - I’ve been dying to work out another no-bake cocktail-cheesecake! (Summer’s still in full swing weather-wise and turning on my oven right now truly sounds like the world’s worst idea.) So I wanted an all-season-friendly dessert equivalent of the cocktail!
At first, I wasn't sure there was a way to actually do this. ("How much liqueur can I actually add before I just end up with cheesecake-soup?") Here's the thing, though -
Some instant Jell-O pudding mix means you can add some pretty decent amounts of the liqueurs in without messing up the consistency! (Just think about Jell-O shots if you doubt me on this one. 😉 )
I eventually got a little more aggressive on this one and mixed in 4oz of vodka and Kahlua. One (3.4oz) box of pudding mix was enough to hold a cheesecake consistency, but the liqueur flavors come through strong!
I started off with more instant espresso than I eventually included in the recipe. (I used a full 2 Tablespoons of instant espresso powder at first). I figured - hey, Espresso Martini cheesecake; it’s got to have a good punch of espresso flavor! I definitely overshot my first round. There WAS plenty of espresso flavor - but there was SO much it got a touch bitter and masked the liqueur flavors a bit. I backed it down to 1 Tablespoon and that seemed a better flavor balance.
"Should I use chocolate or vanilla instant pudding?"
- I called in a slew of taste-testers to make this decision for me! I liked them both for different reasons, (so I went back and forth and back and forth on which pudding mix to include in the recipe). Vanilla and chocolate were both delicious! I felt like the chocolate pulled a little attention away from the real ‘Espresso Martini’ flavor - but I really liked the flavor overtones that the chocolate added. (Chocolate addicts unite, right?)

Here's what the taste-testers had to say!
Of the 12 people I had try both types, 3 liked the vanilla one better, 8 liked the chocolate one better - and I had one "Holy [edited]; they're both SO good!"
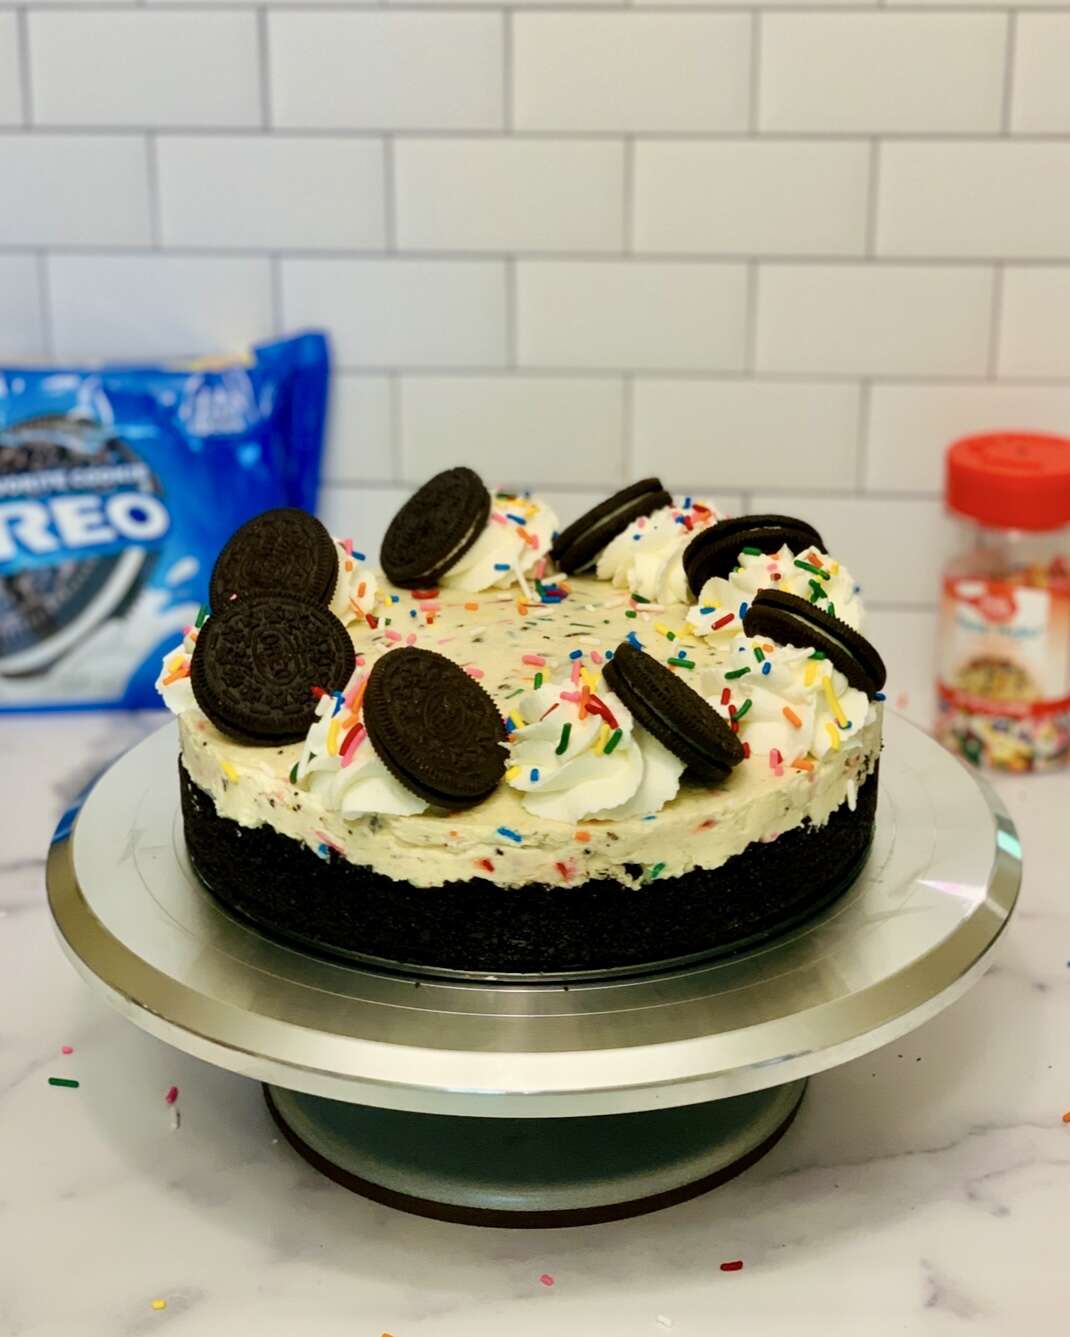
I pulled out some whipped cream and chocolate-covered espresso beans to decorate. (I figured since the cocktail usually has a touch of lighter-colored foam on the top mirroring that with the cheesecake decoration would fit the theme.) And here’s the end result!
Why make this espresso martini cheesecake?
- Flavored with the actual flavors of the cocktail!
- Includes enough coffee liqueur (I used Kahlua) and vodka that they can be clearly tasted - but pairs them with the creaminess of cheesecake!
- Serves a crowd
- Very minimal hands-on prep time
- Can be easily converted to serve in martini glasses if you’d rather!
Okay! On to the recipe!
(Disclosure: As an Amazon associate I may earn from qualifying purchases, and my posts often contain affiliate links. If you click a link and make a purchase, I may receive a commission at no extra cost to you!)
Don't forget to pin this recipe for later!


No-Bake Espresso Martini Cheesecake
Equipment
- 9-inch springform pan (9- or 10-inch; I've tried both)
- Hand or stand mixer
- Piping bag with large star tip (optional)
Ingredients
Crust
- 22 Oreo cookies whole cookies; well-crushed or blended (sub in Nilla wafers plus cocoa powder if you don’t have Oreos on hand- but I like the creaminess that Oreos add to the crust.)
- 4 Tablespoons Butter
Cheesecake
- 24 ounces cream cheese (3 blocks, softened)
- 3.4 ounces Chocolate pudding mix (one package; JUST the mix-no milk)
- ½ cup vodka brand’s up to you
- ½ cup Kahlua or other coffee liqueur
- 1 cup granulated sugar
- 1 rounded Tablespoon instant espresso powder (or add ⅓ cup prepared espresso - but back the liqueur amounts down to ⅓ cup each if you do)
- 1 teaspoon vanilla extract (optional, but really does seem to add something to the flavor.)
- 1 ½ cups heavy whipping cream (about 3 cups whipped)
Topping
- ¾ cup heavy whipping cream (about 1 ½ cups whipped)
- ¼ cup granulated sugar (add to whipped cream - if you'd like to stabilize the whipped cream whisk in ½ teaspoon of powdered gelatin before adding to the whipping cream)
- 1 Tablespoon Kahlua
- Chocolate-covered coffee beans
Instructions
Crust
- Crush or blend Oreos to a crumb consistency - the finer they’re crushed the easier your crust will be to press into the pan, and to cut cleanly later. Pour in melted butter and stir until well combined. Press into springform pan and chill in the refrigerator for at least 10 minutes.
Cheesecake
- Beat softened cream cheese until smooth. Add about ½ of the pack of pudding mix - gradually so it doesn’t clump - and beat until well-mixed. Add vodka and the other ½ of the pudding mix, and beat until combined. (adding all the liquid at once can split the cream cheese and make it weird and lumpy). Repeat with the coffee liqueur and the granulated sugar, then pour in the espresso powder and vanilla and beat until well-combined.
- Whip 1 ½ cups of heavy cream until stiff peaks form. (Okay to substitute pre-made whipped topping if you prefer! Taste won’t be the same, but it’s faster/easier.)
- Gently fold in whipped cream (the mixture will be fairly thick. Mix until well-combined and uniform in color and consistency, but don’t overmix.)
- Transfer to springform pan on top of the Oreo crust and smooth. It will be soft-set in 15 minutes or so; for best results allow to chill 2-3 hours or overnight.
Decorating
- Combine remaining ¾ cup of heavy cream with sugar and 1 Tablespoon Kahlua; whip until stiff peaks form. Transfer to a piping or plastic bag; top cheesecake with whipped cream and espresso beans. No limits here; decorate to your heart’s content! ;)
- High-five yourself on your *awesome* Espresso Martini cheesecake - and enjoy!
Video
Notes
Nutrition
Did you make this no bake Espresso Martini Cheesecake?
Please consider leaving a recipe rating and / or comment at the bottom of the page! This really helps other bakers find recipes they’ll love!
Send me an email and let me know how it went – or make my day and find me on Pinterest or on Instagram or on TikTok and tag @IntensiveCakeUnit in your photo or video!
Other recipes you may enjoy...
(Click / tap the photos below to be taken to the recipe pages!)