Don’t want to turn on your oven this summer?
Try this this 6-ingredient no bake Crème brûlée cheesecake!
Continuing my no-bake cheesecake kick this summer! Don’t get me wrong; I’d love to be experimenting with regular cheesecakes. More options, and not much beats them for texture.
BUT I also don’t want to kill myself or my family with the heat this summer. I’ve covered my issues adjusting to the heat + humidity in the south before, so I’ll spare you the details now.
But suffice to say I’m NOT TURNING ON MY OVEN UNLESS I HAVE ABSOLUTELY NO OTHER CHOICE.
Until about November.
Anyway- WHY try this recipe?
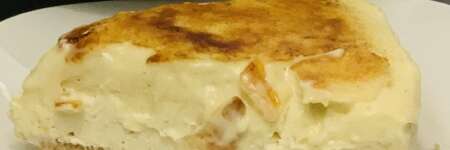
Crème brûlée cheesecakes are hard to beat – this one in particular I’ve actually made several times. Brûléed cheesecakes are easily my favorite cheesecakes to make. The top isn’t just gorgeous – and delicious – it is SO FUN to do!! Something about firing up my torch and watching all that sugar melt and caramelize is just SO intensely satisfying.
The other intensely satisfying thing about this cheesecake? It’s a dessert my whole family likes! Not an issue I ever thought I’d have, but – well – here we are.
My husband’s just not a big fan of cake. Figures. He’ll take a few bites – mostly to humor me, I think – and he’s done.
My daughter avoids the cake layers, picking out the frosting + filling.
My son has thrown every piece of cake I’ve ever given him on the ground.
So I made a non-bruleed version of this cheesecake for his 2nd birthday. I made cookies as a backup because I wasn’t sure the kids would go for the cheesecake – and I was wrong! We had a full table of kids all eating cheesecake. It was wild. And felt like a big win to me. 😉
The snag I hit recipe-testing this one?
Cheesecake consistency. (Read: melted cheesecake is NOT the business.)
Not that melty cheesecake is the worst thing in the world – it’s just as delicious even if it gets melty – but holy moly is it MESSY. Maybe one of the messiest desserts I’ve ever cut and tried to serve. Figures that would be my first turn-out – cause we had extra company in town the night I road-tested round one. Curse you AND your law, Murphy.
I’ll admit it; baked cheesecakes have a leg up here. their consistency is more solid and they don’t soften or melt under the heat of the torch so easily.
BUT! Persistence paid off – and you CAN make an amazing no-bake cheesecake that won’t turn into a puddle on you.
Here are the 2 things that can save you here – the freezer, and (optional) a bit of gelatin. (I used a few tablespoons of pudding mix.)
- The freezer will set the cheesecake more firmly, so that it can hold up and not melt so badly under the torch. My best success has been freezing it about an hour. Please note cream cheese can get weird if frozen solid and then thawed though. I don’t recommend freezing the cheesecake longer than about an hour.
- The gelatin – though it can eventually also melt – doesn’t melt as quickly, so it gives the cheesecake more structure and makes it less prone to turn to goo before it’s served. 😉 One of my happiest moments all summer was cutting into my third test run and NOT seeing a melty mess. Score!!
“Do I actually need a brûlée torch?”
Short answer is no! You CAN do this with a flamethrower if you don’t have a brûlée torch! Make sure you have a good amount of fuel though. It’ll take a bit to torch the whole cheesecake top.
I will say a brûlée torch does make things easier. I bought my torch in 2017 and it’s going strong 8+ years later. I paid less than $15 for it on Amazon, and my last price check (2025) it’s still the same price.
You can also use the broil setting in your oven – though I feel like that does a bit defeat the purpose of a no-bake cheesecake.
“Do I need superfine sugar?”
Again – you CAN do this with regular granulated sugar. Just be aware it’ll take a bit longer to melt, and so it’s a little easier to burn it. (Reportedly) – If you have a blender or food processor, you can pulse the sugar in one of those for 20-30 seconds (disclaimer: this is according to the America’s Test Kitchen gurus. I’ve not personally tried it yet as I don’t own a food processor.) Either way, finer crystals will melt more easily under the torch.
Quick note on torching time versus serving time!!
BE AWARE the brûléed top doesn’t stay crunchy forever! Sugar – even caramelized sugar – does re-dissolve after some time in moisture. And this caramelized sugar is sitting on top of a no-bake cheesecake – which tend to hold more moisture than a baked one.
You can torch the cheesecake maybe an hour or so ahead of time. But I wouldn’t torch it much further ahead than that. The sugar sitting on top of the cheesecake will start to re-dissolve – the flavor will still be there but you’ll start to lose that crack + crunch. Which is – in my opinion – the best part. 😉
Okay! On to the recipe!
(Disclosure: As an Amazon associate I may earn from qualifying purchases, and my posts often contain affiliate links. If you click a link and make a purchase, I may receive a commission at no extra cost to you!)
Don’t forget to pin this recipe for later!

No-Bake Creme Brulee Cheesecake
Equipment
- 9- or 10-inch springform pan (I usually use a 10-inch springform – more room for bruleed sugar on top!)
- Hand or stand mixer
- Brulee torch or flamethrower (+ fuel; maybe I’m just slow but torching a whole cheesecake usually takes me 5-6 minutes)
Ingredients
Crust
- 2 cups Nilla wafer crumbs (60 regular or 90 mini cookies – 180g or about 6.5 ounces)
- 6 Tablespoons Butter
- 2 Tablespoons brown sugar (optional)
Cheesecake layer
- 2 cups heavy whipping cream (about 4 cups whipped)
- 16 ounces cream cheese softened
- ¾ cup sugar (superfine or granulated both work)
- 1 Tablespoon vanilla bean paste
- ¼ cup instant vanilla pudding mix (optional: JUST the powdered mix. You can leave this out and just freeze the cheesecake 10min longer. ¼ cup is about half a 3.4oz package.)
Decorations
- ¼ cup superfine sugar (granulated will work also; it just takes a little longer to melt.)
- FIRE!! (Kidding. kinda. 😉 )
Instructions
Crust
- Crush or blend Nilla wafers to a crumb consistency – the finer they’re crushed the easier your crust will be to press into the pan, and to cut cleanly later. Pour in melted butter (and sugar if using) and stir until well combined. Press into a springform pan and chill in the refrigerator for at least 10 minutes.
Cheesecake
- In another bowl, beat cream cheese until smooth. Add sugar, vanilla bean paste, and pudding mix if using. Beat until well-combined and set aside.
- Whip 2 cups of heavy cream until stiff peaks form. (Fine to substitute pre-made whipped topping if you prefer!)
- Gently fold in whipped cream – continue folding until the mixture is even in color and consistency, but try not to overmix or the whipped cream will lose too much volume.) Transfer to springform pan on top of crust and smooth. Chill until you're ready to transfer it to the freezer before torching – see the next step for details.
- Freeze time!! My best success so far has been putting the cheesecake in the freezer AN HOUR AHEAD of when I plan to torch + serve it. This keeps the top of the cheesecake from melting.
Bruleed top
- This is the FUN PART!! Time to break out the brulee torch! Sprinkle a layer of sugar over the top of the cake. It should be enough to cover the top of the cheesecake so the cheesecake doesn’t show through. (Also though- worth noting the thicker the sugar is, the longer it will take to melt and the more likely it can be to burn (in my experience).
- Start the torch – and start caramelizing that sugar! (I usually work in small sections and move on to a new section if I notice sugar starting to burn. If there’s any un-dissolved sugar left in the prior section I come back to it when it’s had a minute to cool down.)
- High-five yourself on your INCREDIBLE CHEESECAKE – and enjoy! I hope you love this recipe like we do!!
Video
Notes
Nutrition
Did you make this no bake Creme Brulee cheesecake?
Please consider leaving a recipe rating and / or comment at the bottom of the page! This really helps other bakers find the recipe. Appreciate you! 🙂
Send me an email and let me know how it went – or make my day and find me on Pinterest or on Instagram and tag @IntensiveCakeUnit in your photo!
Other recipes you may love…
(Click / tap the photos to be taken to the recipe pages!)


Leave a Reply