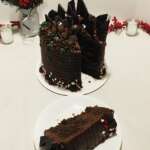
Christmas Fudge Truffle Overload Cake
This Christmas Fudge Truffle Overload Cake combines chocolate cake, chocolate cream cheese frosting, and a overload of chocolate and truffles!
Servings: 16 servings
Calories: 796kcal
Equipment
- 1 10 inch cardboard cake circle (or 8-inch; I've found moving cakes easier on larger circles)
- large piping bag + star tip (linked is a set that contains both)
- Wilton icing comb (optional, but adds a fun decorative effect)
Ingredients
Fudge Truffle cake layers
- 2 ¼ cups all purpose flour (350g)
- 2 ¼ cups granulated sugar (450g)
- 1 ¼ cup cocoa powder (100g)
- 1 tsp baking soda
- ¾ tsp salt
- 1 cup unsalted butter (2 sticks/250g; room temperature)
- 4 large eggs (at room temperature)
- 1 ½ cups buttermilk (350mL)
- 2 tsp vanilla extract
Chocolate Cream Cheese Buttercream
- 8 ounces cream cheese (one package; softened)
- 1 cup butter (two sticks, softened)
- 5 ½-6 cups powdered sugar
- 1 cup cocoa powder
- 2-4 Tablespoons milk
- 1 Tablespoon vanilla extract
- ¼ teaspoon salt (if using unsalted butter)
Decorations
- Christmas sprinkle mix of your choice - (I used candy cane and holly sprinkles)
- 30-40 chocolate truffles (I bought a large pack at Costco; also available online!)
- 1 Chocolate bar (broken into irregular pieces; I used one of my favorite bars from Ghiradelli)
Instructions
Fudge Truffle cake layers
- Preheat an oven to 350℉ (180℃). Grease 3 8-inch cake pans with baker's floured spray and/or line pans with parchment rounds.
- Mix together dry ingredients (flour, sugar, cocoa powder, baking soda, and salt) in the bowl of a stand mixer with a paddle (or hand mixer or whisk) until well combined.
- Add in bits of softened butter, mixing until no lumps of butter are visible and the mixture looks crumbly.
- Whisk together eggs, buttermilk, and vanilla. Add to dry ingredients and mix until no dry ingredients are visible. Scrape down the bowl and beat for another 20 seconds.
- Fill the three pans evenly - I find a kitchen scale helpful for this part, and each of mine weighed out to about 550g. Bake for 30-35 min or until a toothpick inserted comes out clean. Allow cake layers to cool for 10-15 minutes on a wire cooling rack before removing from pans, and cool completely before frosting. Set in the fridge or freezer to accelerate the cooling process if desired.
Chocolate Cream Cheese Buttercream
- Beat together softened cream cheese and butter; slowly add in powdered sugar alternating with cocoa powder and milk until frosting reaches desired consistency. Add vanilla and salt and beat until well combined.
Assembly
- Once your cakes are cool, level them (if needed). Place a smear of frosting on your cake circle (to keep the cake from sliding while you decorate it) and center your first cake layer in the center of the circle. Spread the layer with frosting, and pipe a rim around the outside.
- Cut chocolate truffles into chunks – I used ½ to 1/3 of a truffle for each one – and lay them over the cake layer. Pipe a bit of frosting in between the truffles so your next cake layer will stick when you set it on top.
- Repeat the process with your remaining cake layers, adding the final layer on top.
- Now you're ready to crumb-coat. (If you're unfamiliar with crumb-coating, it's just what it sounds like – spreading a thin layer of frosting over the entire outside of the cake to keep crumbs out of your final layer)
- Once your crumb coat has set (this takes about 5-10 minutes in the fridge), add your final layer of frosting and smooth - I started with an offset spatula and bench scraper to make texturing the frosting with the icing comb easier. Using several passes around the cake and cleaning off the comb as needed, use the icing comb to texture the frosting on the sides of the cake.
Onto the fun part - Decorating!
- I piped a semicircle of icing onto the top of the cake, and used it to anchor pieces of broken chocolate – optional, but I liked the way it looked on top of the cake. (If you’re more of a traditional cake decorator, you could just rim the cake with squares or leave it off completely. Up to you!)
- Decorate with large chocolate pieces at the back, smaller ones toward the front, and truffles in the open space at the front of the cake. Add sprinkles to your liking! I scattered a few more Christmas sprinkles over the top of the cake, and then used some holly and berry sprinkles around the base and upper rim of the cake.
- Annd you’re done! Pat yourself on the back – you just created a chocoholic’s dream cake!
Video
Notes
(Please note nutrition information is an estimate and may not be exactly accurate.)
Nutrition
Serving: 1serving | Calories: 796kcal | Carbohydrates: 100g | Protein: 9g | Fat: 40g